Simple CMS Database Backup with phpMyAdmin
A tutorial for simple CMS Database Backup with phpMyAdmin.
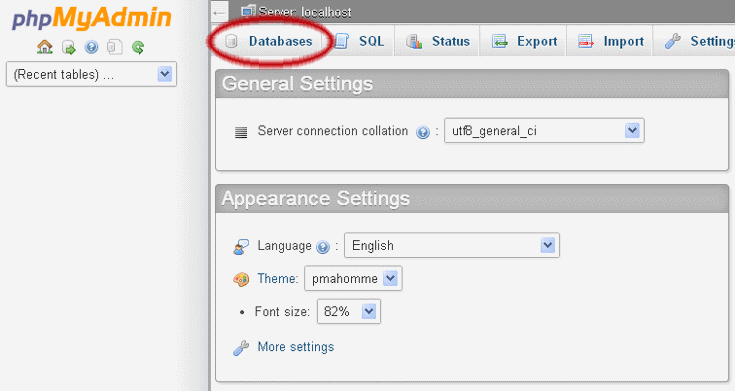
1. Once you have entered into phpMyAdmin (which can be done via cPanel), click on the Database button. In certain version of phpMyAdmin you may be automatically redirected to this area upon logging into the system.
2. Here you will see all databases associated with your cPanel account. Select the database that you wish to backup form the ones shown within phpMyAdmin.
3. After you have selected all databases you would like to be backed up, you will click the Export button. There are two methods of export, Quick and Custom. In most situations Quick export will be what you select, however if you want to ensure any custom tables are included in the database you will want to use Custom with the following options:
4. Now that you have the database downloaded via the Export tool, you should store it in a safe location that preferably has redundancy. You have now successfully downloaded and backed up your CMS database.
1. Once you have entered into phpMyAdmin (which can be done via cPanel), click on the Database button. In certain version of phpMyAdmin you may be automatically redirected to this area upon logging into the system.
2. Here you will see all databases associated with your cPanel account. Select the database that you wish to backup form the ones shown within phpMyAdmin.
3. After you have selected all databases you would like to be backed up, you will click the Export button. There are two methods of export, Quick and Custom. In most situations Quick export will be what you select, however if you want to ensure any custom tables are included in the database you will want to use Custom with the following options:
- Select all the tables.
- In the Output section check Save output to a file and select None for Compression. (If your database is very large use a compression method)
- Select SQL from the Format drop-down menu.
- Check "Add DROP TABLE": this can be useful for over-writing an existing database.
- Check "IF NOT EXISTS": this prevents errors during restores if the tables are already there.
- Click Go. The data will now be saved into your computer.
4. Now that you have the database downloaded via the Export tool, you should store it in a safe location that preferably has redundancy. You have now successfully downloaded and backed up your CMS database.
