Configure a Backup Job in Veeam
Overview
Backup jobs can be created to schedule the backing up of data from your agents that are covered being managed by Veeam. This article will be covering how to create a new backup job, although you can apply the information within it to configure a backup policy as well. This will also be written assuming that you intend on saving backups to a Cloud Connect repository such as the one we provide, but the same general process can be followed for configuring a job for a network share or backup repository.
HostDime Veeam Service Provider Console
The easiest way to configure a new backup job is from the HostDime Veeam Service Provider Console. Backup jobs can be easily created and managed across all of your configured agents from this interface which makes it convenient as opposed to needing to access the target system.
- Login to the HostDime Veeam Service Provider Console at https://draas.hostdime.com:1280/. The welcome email you received will have the credentials you need to log in here.
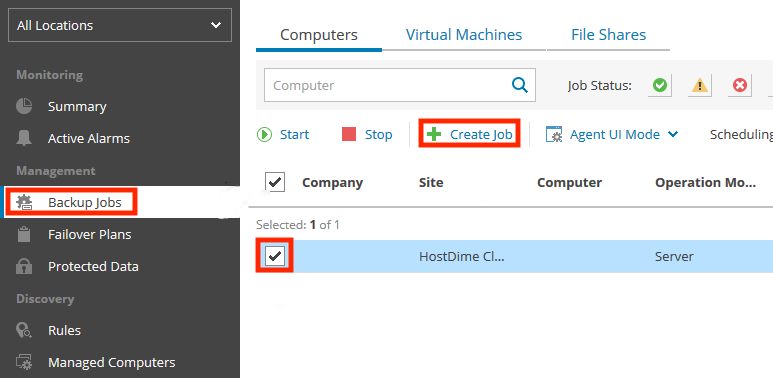
- Once logged in, click the Backup Jobs tab on the left hand side
and ensure you are on the Computers tab. Select the system you
are configuring the new job for and press Create Job.

- You will now be viewing a new prompt entitled that will walk you through creating a backup job. As you are likely creating a new job from scratch, select Create a new job and press Next.
- On the Name step, type a name and description (optional) for your new backup job and press Next.
- On the Operation Mode step, select the type of server that the agent is running on and press Next.
- On the Backup Mode step, select the type of backup you would like to create. The type of backup you should select depends on the scope of data you'll want to be backing up. For example, if you are only backing up a selection of directories, then it would make sense to backup at the file-level rather than backing up the entire volume/filesystem that the files reside on.
- Depending on the type of backup mode you selected, you will be asked
to further specify the data that is to be backed up.
- Volume level backup: The Volumes step will allow you to input a list of volumes to backup. To add a volume, input a single path and press Add until all volumes are present. Press Next to proceed.
- File level backup: The Files step will allow you to input a list of directories to backup. To add a directory, input a single path and press Add until all directories are present. Press Next to proceed.
- On the Destination step, select Veeam Cloud Connect repository and press Next.
- On the Backup Resources step, select a repository that has space available for your backup. You will also want to change the Retention Policy value as each restore point retained will use additional space in the selected repository. Press Next to proceed.
- On the Credentials step, input your Veeam Service Provider Console credentials. Press Next to proceed.
- The Backup Cache step is optional and only configurable when backing up to a remote target such as a shared folder, Veeam backup repository, or a Veeam Cloud Connect repository. It is recommended to enable this setting if you have the available space to do so. This will depend on the size of the backup as well as the amount of space locally available on the backed up system. This will allow the backup agent to upload a created backup at a later time in case it is unable to connect to the backup target immediately. If this is not enabled and the backup target is not available at the time of the backup, then the creation of the restore point will fail. Press Next to proceed.
- The Guest Processing step will provide additional options that not all users may need. If you are unsure about what to select, you can simply skip this step and come back to it in the future if needed or configure a new job.
- The Schedule step provides multiple conditions for restricting when the backup job will run and for how long. This section is entirely up to your preference, although typically you would want to schedule the backup job for a time on the server when there is little activity. Press Next to proceed.
- The Summary can be reviewed one final time to ensure that you
have configured the job to your preference. Once ready, press
Finish to create the job and assign it to the selected system.
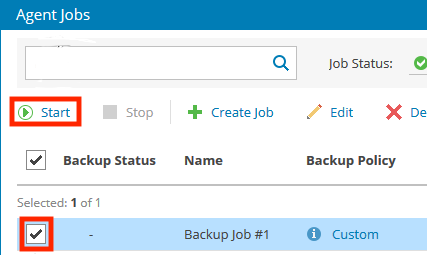
- The backup job will not be run immediately, so if you do not
want to wait for the time you have scheduled you can select the
specific job you have created and start it manually.

- The backup job will not be run immediately, so if you do not
want to wait for the time you have scheduled you can select the
specific job you have created and start it manually.
Linux Agent
-
Execute the following command to access the configuration tool for the Veeam Agent. The selected option in the Terminal User Interface (TUI) can be changed using the arrow and tab keys on your keyboard, and options can be toggled with the space key. To begin with configuring a backup job, press C.
# veeamconfig ui -
On the Name step, input a name for the backup job and press Next to proceed.
-
On the Backup mode step, select the type of backup you would like to create. The type of backup you should select depends on the scope of data you'll want to be backing up. For example, if you are only backing up a selection of directories, then it would make sense to backup at the file-level rather than backing up the entire volume/filesystem that the files reside on. Press Next to proceed once done.
-
If you selected Volume level backup or File level backup, the next step will be to further specify the data that is to be backed up. If you selected Entire machine, then you can skip this.
- Volume level backup: The Volumes step will allow you to input a list of volumes/filesystems to backup.
- File level backup: The Files step will allow you to input a list of directories to backup.
-
On the Destination step, select Veeam Cloud Connect repository and click Next. If queried for repository address and port use
gateway.draas.hostdime.comand port6180 -
On the Credentials step, input your Veeam Service Provider Console (https://draas.hostdime.com:1280/) username and password. Do not input a company as part of the username.
-
On the Repository step, select a repository that has space available for your backup. You will also want to change the Restore Points value as each restore point retained will use additional space in the selected repository. Press Next to proceed.
-
The Advanced step will provide additional options that not all users may need. If you are unsure about what to select, you can simply skip this step and reconfigure the job in the future if needed or create a new job.
-
The Summary can be reviewed a final time to ensure that you have configured the job to your preference. If you do not want the job to run outside of the scheduled times, deselect Start job now. Once you are done you can press Finish to create the job and run it if selected.
Windows Agent
The process of creating a backup job from within Windows is very similar to the process within the Veeam Service Provider Console. As much of the information and interface is redundant with what has already been reviewed, this section will be very brief.
- Access the system where the backup job is being restored and run the
Veeam Agent control panel.
- If there are no backup jobs configured, then the agent may open
the prompt for creating a new backup job immediately. If not,
then you can select the option to create a new backup job from
the control panel.
- If there are no backup jobs configured, then the agent may open
the prompt for creating a new backup job immediately. If not,
then you can select the option to create a new backup job from
the control panel.
- Proceed with configuring the backup job, following a similar process to the Hostdime Veeam Service Provider Console.