Browsing the Internet through an SSH Tunnel on Windows
- Requirements
- Setting up an SSH Tunnel
- Configure the Proxy Service
- Disabling the SSH Tunnel and Proxy Service
VPNs are powerful tools and can help keep your network traffic secure. If you have a VPS or dedicated server, you could even run a VPN service from your server. The issue is that setting up and configuring a VPN can be time consuming and complicated. For some uses, there may be an easier way to securely route your traffic through a remote server (like your VPS or dedicated server).
An SSH tunnel is another method of rerouting some or all traffic from one location (like your local computer) through another (your remote server). All of this rerouted traffic is securely encrypted as it travels between your local machine and the remote server thanks to SSH. With a tunnel active and traffic proxied through the tunnel, that traffic will appear to be coming from your remote server instead of your local machine. This can be useful to bypass remote network issues or restrictive firewalls.
This article will explain how you can set up an SSH tunnel from your local Windows machine.
Requirements
In order to set up an SSH tunnel between a Windows machine and a remote server, you need a few things:
- A Windows machine with at least one open port (the ability to connect to your remote server via SSH).
- An installed copy of a tool capable of creating an SSH tunnel (like Bitvise SSH Client or PuTTY).
- A browser that can use a proxy connection.
- A remote server running SSH and the ability to make other outbound connections to the internet.
- A user account on the remote server that is able to log in via SSH.
Setting up an SSH Tunnel
In order to make an SSH tunnel, choose the program you have elected to use from the tabs below and follow the directions.
Bitvise SSH Client
✅ If you haven't installed the Bitvise SSH Client yet, you can download a copy from here: https://www.bitvise.com/ssh-client-download
Run the installer after you download it and follow the directions.
Bitvise SSH Client is free, but if you like this product, you should consider purchasing their SSH server product if you have a need for it.
- When you launch Bitvise SSH client, it will bring up a window to let
you configure a connection. The first things that you need to
configure are in the Login tab in the Server section.

- Host: Enter the FQDN host or SSH service IP address for the remote server you want to route traffic through.
- Port: Enter the SSH port for this Host. Typically, SSH listens on port 22, so if you are unsure what port to specify, try that.
- Leave the obfuscation items unchecked/empty.
- Stay on the Login tab, but now you have to fill out
the Authentication section to the right.
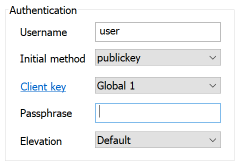
- Username: Enter the username for your remote server SSH account. Although we don't recommend using it, you could specify "root" as the user if you are the main administrator for the remote server and the server allows direct login as root.
- Initial method: This is the method you want to have the
client use to try to log into your account. Typically you should
set this to either password or publickey. Password will
require the password for the Username you specified
above. Publickey will attempt to use a public/private SSH
key pair to securely log you into the remote server.
- Using a public/private key pair can be more secure than using the account password, but it does require that you create or import a key into Bitvise SSH Client using the Client Key Manager (a link to which appears at the bottom of this screen. You'll also want to paste a copy of the public key into the authorized keys area of the remote server account. Typically, this is at ~/.ssh/authorized_keys and you'll want to export your public key in OpenSSH format so it is ready to paste into this file all on a single line.
- If you are using a password only, skip to step e below. If you are using a key, select the key name from the drop-down list and specify the Passphrase for the key (if there is any). You can leave the Passphrase box empty and the system will prompt you for the password during login.
- You can leave Elevation set to Default.
- If you are using a password only, enter the password into the Password field if you want and you can choose to save the password encrypted into the profile if you want. If you don't specify a password, you will prompted to enter it when you try to log into the remote server.
- Leave the rest of this tab empty and go to the Options tab instead.
- The section you need to review is On Login on the right.
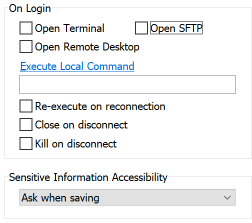
- If you only want to use this profile to create an SSH tunnel, uncheck everything in this section.
- By default Open Terminal and Open SFTP are checked and if you leave them that way, not only will the tunnel be established, but you'll also be connected to a standard terminal session and a separate SFTP session.
- Go to the Services tab so you can enable the SOCKS/HTTP proxy
feature.
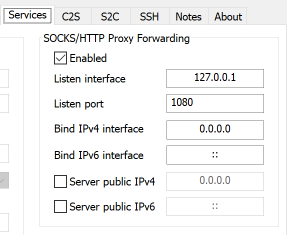
- Check the box next to Enabled in the SOCKS/HTTP Proxy Forwarding section. This will ensure a proxy service is set up to allow you to route local traffic through your remote server.
- Listen Interface: This is the local IP address that the service listens for connections on. You should generally use 127.0.0.1, as that is the IP address for "localhost" (i.e., the specific workstation you are on).
- Listen Port: This is a local port number that the proxy service listens on. The default is 1080, but feel free to change the port if you want/need to.
- The other options can be ignored. You usually won't have to set anything else. If you need to know more about these other options click the Help link.
- Click the Log in button at the very bottom of the Bitvise SSH Client window
- A connection will be attempted and you may be prompted for a password, depending on the method you are using to log in.
- You can also choose to save a copy of this profile so you can double click on it to load it without having to type everything in again.
- Now you can configure the proxy service below.
✅ Depending on the minimization settings for Bitvise SSH Client, you can close all of the open windows and the SSH tunnel will continue. The Bitvise icon will still appear in the system tray, you can right click it to bring up various options or reopen the main settings window.
In addition, the client will automatically try to keep the tunnel connection alive every 20 seconds so that it doesn't get closed due to lack of activity.
Putty
✅ If you don't already have a copy of Putty installed on your local Windows machine, you can download a copy from here: https://www.chiark.greenend.org.uk/~sgtatham/putty/latest.html
If you are unsure what version to pick and you have a recent computer with Windows, the 64-bit .msi installer is the one you probably need.
First you need to use PuTTY to make a special type of connection to your remote server.
-
Start PuTTY.
-
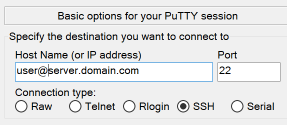
The PuTTY configuration screen will come up. This will allow you to set up or load a connection.
-
In the Host Name (or IP address) field, enter your remote server's login username (you could use root if you are the main administrator of the server, but it is a better idea to use another non-privileged user instead). Follow the username with an @ and then the server's FQDN hostname or IP address.
-
Port: Enter the port number you use to access SSH on the remote server. The default SSH port is 22, so try that if you are unsure what to use.
-
The Connection type needs to be set to SSH.
-
-
In the category sidebar on the left of the configuration window select Connection if you want to configure PuTTY to try to keep the tunnel connection alive so it doesn't get closed due to lack of activity.
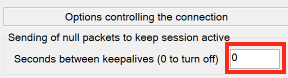
- By default, PuTTY won't try to keep the connection alive, but if you change the 0 to a number of seconds (300 would be 5 minutes, for example), it will attempt to keep the connection active that frequently.
- Below this area are some advanced options for the type of keepalave requests made to the remote system. Generally, you shouldn't have to change these.
-
Now click on SSH in the category sidebar on the left. Here you can choose not to enable an interactive shell in the terminal window when you make a connection. This is optional, but might be something to consider if you only plan to use the connection for the SSH tunnel itself.
-
This step is only needed if you plan to use a public/private key pair with the remote server. In the sidebar, click the small + next to SSH and click on Auth from the sub-menu.
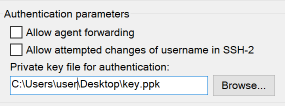
- If you want to use a public/private key pair to log into your remote server and you don't already have one in PuTTY, you can use the PuTTY Gen application (included with a full install of PuTTY or as a separate download) to create a public/private key pair. Keep the private key securely on your local workstation and upload the public key typically in OpenSSH format to ~/.ssh/authorized_keys on the remote server.
- Your private key must be in PuTTY format (.ppk file). Once you have one, you can add it in the Private key file for authentication field by manually typing the full path or clicking the Browse... button and selecting your saved key.
-
Click on Tunnel in the category sidebar (it is a sub-option of the SSH section, so click the + next to SSH to see it if you haven't done so already).
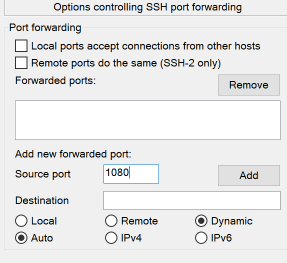
- We need to specify what local port (on your Windows machine) the SSH tunnel will operate on. This can be any port that is open for local connections and that isn't being used by another service. Type a port number into the Source Port field. For this example, we're using port 1080.
- You can leave the Destination field blank in most cases.
- Select the Dynamic mode radio button.
- Click the Add button to add this forwarding port. It will be added to the Forwarded ports list and look like this: D1080 which shows that the tunnel is going to operate on port 1080 in dynamic mode once a valid connection is made.
-
Now you should scroll up the category sidebar and select Session at the top of the list (this is where you started originally). Now that you've configured everything, it is a good idea to save all of these settings so you don't have to re-enter them again in the future.
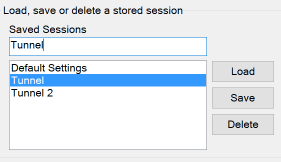
- Type the name you want to give these SSH tunnel settings into the Saved Sessions text field and click Save on the side of the saved sessions list. The name you specify will appear in the list. You can double click on this name in the list to immediately attempt to connect using the settings you saved.
- Since the settings are already filled in, you can also click the Open button at the bottom of the configuration window to start the connection process. You'll be prompted to enter a password unless you are using a key without a password assigned (which isn't a good idea).
You can now configure the proxy service below.
Configure the Proxy Service
✅ Visit https://hostdime.com/ip in your web browser before completing this step and make a note of the IP address. The reported IP address should change once the system is set to use the proxy.
Now that there is an active SSH tunnel, you need to configure your local computer to use the tunnel to route traffic.
✅ Your traffic is not secure until you complete this step.
The best way to configure the proxy service in Windows 10 is to set it up for your user account on the local machine. You should use that method unless you are unable to do so for some reason. Alternately, you can configure your web browser only to use the proxy.
Windows 10
✅ Are you running Windows 8.1?
These directions are for Windows 10, but Windows 8.1 is very similar, just select PC Settings from the Windows/Start menu and then follow step 3 onward.
Using this method, all traffic via Ethernet connections or WiFi will be transmitted securely over the SSH tunnel. If you are using a VPN, the proxy setting will be ignored.
- Click the Windows/Start menu and click the the small gear icon to
the left side of the menu. This is Windows Settings.

- Click on Network & Internet from settings.

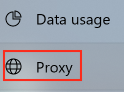
- Click on Proxy in the sidebar on the left in the new window.
- Scroll down to the Manual proxy setup section and click the
toggle switch next to Use a proxy server to turn it on.
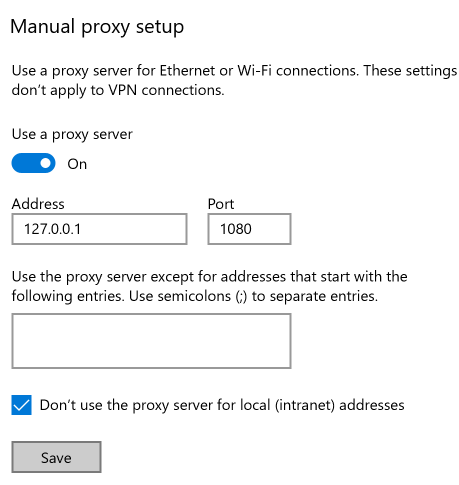
- Now you should be able to edit the settings in this area. Start by filling in the Address text field. Enter 127.0.0.1.
- Enter 1080 in the Port text field (or whatever port you chose earlier when setting up the local port for the proxy service).
- You can fill in domains that you don't want going through the proxy or check the box to allow local addresses (anything starting with an IP address of 10. or 192.) to not go through the proxy if you want.
- Click the Save button to apply these changes.
Traffic will immediately start flowing through the proxy. This includes most web browsers, as they will typically use whatever the OS has configured by default.
Test it by revisiting https://hostdime.com/ip and make sure your reported IP address has changed. If you don't see a change in the IP address, try forcing the page to refresh or quit and restart your browser and try again.
Google Chrome
Google Chrome uses the account-wide proxy settings, but if you can't follow the directions in the Windows 10 tab, there is at least one extension you may be able to use.
⚠️ With the extension method, DNS requests are not routed through the SSH tunnel and so someone on your local network may still be able to see what sites you visited (even though they won't be able to see what you did while on those sites).
Also, you should be careful about what extension you use for this as a nefarious extension could end up watching your traffic or sending you somewhere you don't want to go.
For the purposes of this demonstration, we will use Proxy SwitchyOmega, which is an open source plugin.
- Install the proxy extension from here: https://chrome.google.com/webstore/detail/proxy-switchyomega/padekgcemlokbadohgkifijomclgjgif
- Once installed, the extension will offer to take you to the proxy settings page so you can set up the proxy. Go through the short introduction process.
- There will be a default Proxy profile. You can adjust those
settings to match the local proxy you set up earlier.
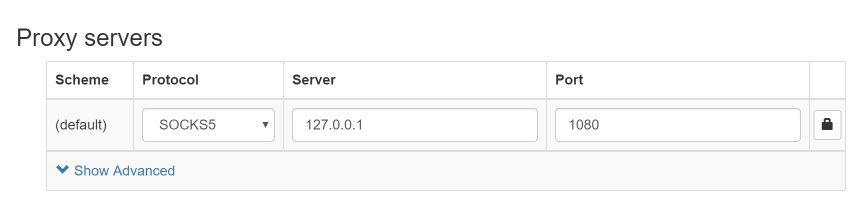
- Set the Protocol to SOCKS5 from the drop-down list.
- The Server should be set to 127.0.0.1.
- Finally, the Port should be 1080 (or whatever local port number you assigned the SSH tunnel earlier).
- Apply these changes by clicking the Apply Changes button in the
sidebar on the left.

- Now you can select Proxy from the small round circle icon to the
right of the address bar.
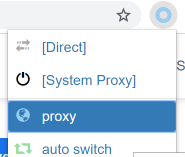
The round icon will change color depending on what proxy you are currently using.
Test it by revisiting https://hostdime.com/ip and make sure your reported IP address has changed. If you don't see a change in the IP address, try forcing the page to refresh or quit and restart your browser and try again.
Details
Firefox
Firefox can use the system-wide proxy settings, but if you can't use them for some reason, Firefox supports configuring a proxy just for use with itself, no special extensions are needed.- From the hamburger menu (the menu item that looks like 3 parallel
lines), select Options.

- You will be in the General section of the options, scroll down
to the bottom and click on the Settings... button in
the Network Settings section.

- Now you need to fill in the proxy details based on the proxy you set
up earlier.
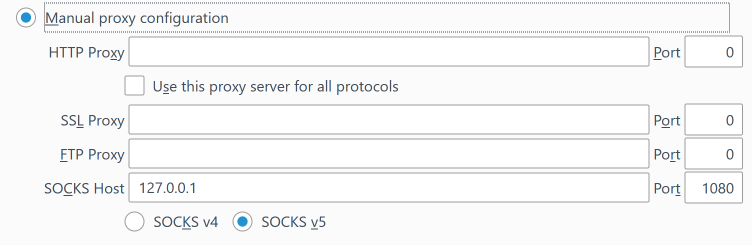
- Select the radio button next to Manual proxy configuration
- In the SOCKS Host section, enter 127.0.0.1.
- Enter 1080 as the Port (or whatever local port you selected when you set up the SOCKS proxy earlier),
- Click the radio button to select SOCKS v5.
- There are a few more options to consider before finalizing setup.
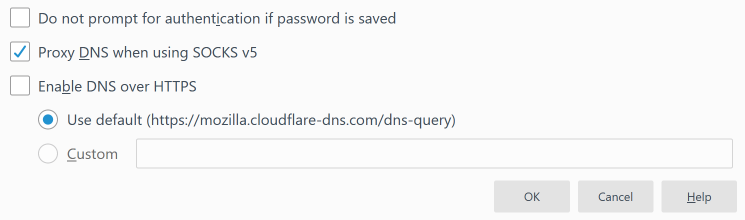
- Neither of the SSH tunnel options we set up require a password or authentication to use, so the first option, Do not prompt for authentication if password is saved is not going to affect anything.
- The important item is Proxy DNS when using SOCKS v5. You should check the box next to this option, otherwise your DNS requests will be made locally and someone will be able to see what sites you visited even if they can't see what you did when you went there.
- Enable DNS over HTTPS: This will provide an additional layer of security at the risk of slowing down access to websites even more (at least on the first access).
- Click the OK button to apply these changes.
Test the proxy by revisiting https://hostdime.com/ip and make sure your reported IP address has changed. If you don't see a change in the IP address, try forcing the page to refresh or quit and restart your browser and try again.
Microsoft Edge
Microsoft Edge uses the account-wide proxy settings, so please follow the directions in the Windows 10 tab.
Disabling the SSH Tunnel and Proxy Service
When you want to return traffic routing to normal, you should turn them off in the opposite order that you enabled them originally.
- Disable using the SOCKS proxy.
- Disable the SSH Tunnel and Log out of your remote server.
- Confirm traffic is once again flowing normally.