Plesk to InterWorx Migration
If you have accounts you need to move from Linux servers to your server with InterWorx, there are several tools designed to make this process easy.
✅ If you have an InterWorx server with HostDime, feel free to contact us to help you with your data migration. Our experts will take the hassle out of this process.
Migrate Accounts
The first step is to migrate accounts from another server.
✅ Migrations must be done by an InterWorx administrator (not a reseller or regular user) and they must have direct root access to the source server if the mass import tool is going to be used. If a single account is going to be imported then root access is not required on the source server, only access to a full unencrypted backup made by the other control panel.
Select the type of control panel you are trying to move accounts from the expandable tabs below.
cPanel
⚠️ InterWorx can import a lot of information from cPanel servers, but not everything. Before starting the migration, you should understand what won't be migrated:
- Reseller account permissions and ownership do not get copied over. While InterWorx can transfer cPanel reseller accounts, it does not grant corresponding InterWorx reseller privileges, nor will it retain cPanel resold account ownership. You will need to create assign reseller privileges after accounts have been transferred.
- InterWorx doesn't support every feature cPanel does, so Mailman mailing lists, PostgreSQL databases, server-side Java, Ruby on Rails, and NodeJS will not migrate successfully.
- InterWorx does not currently support DNSSEC, so if domains in cPanel are using that, it should be disabled at the registrar and in the cPanel account prior to migration.
- Web statistics will not be migrated.
- InterWorx does not support the MDBOX mail format, so if you were using that format on your cPanel server (or if you are not sure if you do), run the following command on the cPanel server as root (or have the server admin do it). Replace CPANELUSER below with the cPanel account's username that contains the mail you want to convert.
/usr/local/cpanel/scripts/convert_mdbox_to_maildir --user=CPANELUSER --delete-old-format- Not everything that appears in the home directory for an account on a cPanel server will be migrated to the InterWorx server. Only those items that InterWorx specifically knows it needs will be transferred. So mail and web pages will get moved, but Softaculous or Fantastico script auto installer data, as an example, will not.
- MySQL/MariaDB databases and users will be migrated, but they might need to have their names changed. If this happens, InterWorx will note the change in the migration log as well as put a notice into the migrated account for the user to see. This is important because if a script relies on accessing that database, you'll need to manually update the script configuration file with the new details.
- InterWorx will read the cPanel hosting package and feature set and try to replicate those settings as close as possible, but not all limitations or settings may be possible on the InterWorx server.
Mass Migration from cPanel
✅ You'll need gather the following before getting started:
- The source server's hostname or IP address.
- Root access to the cPanel server and administrative access to the InterWorx server.
- The port for SSH on the cPanel server.
- A list of accounts that need to be migrated.
Here's how to mass migrate cPanel accounts:
-
Log into your InterWorx server as an administrator.
-
Ensure that the cPanel server's SSH port is open in the firewall on the InterWorx server or connections will fail.
-
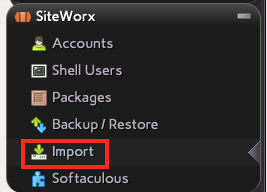
Select Import from the SiteWorx section of the NodeWorx interface.
-
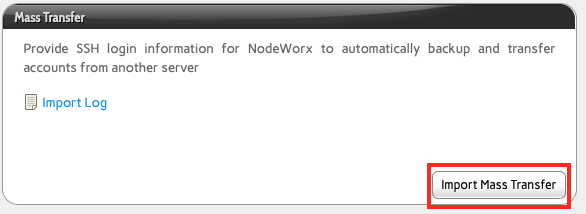
Click the Import Mass Transfer button.
-
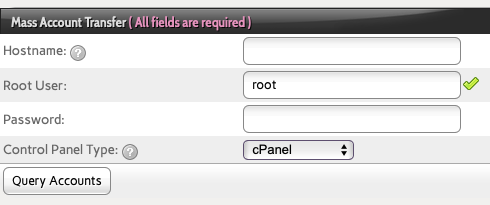
Enter the details needed to access the remote cPanel server.
-
Enter the Hostname or IP address of the remote cPanel server. If the cPanel server runs SSH on a port other than 22, add a colon followed by the port number without any spaces.
-
InterWorx can only access the remote cPanel server if it allows direct password login as the Root User. If needed, ensure you permit direct root logins on the remote server from your InterWorx server.
-
Type in the root Password for the remote server.
-
The Control Panel Type should be set to cPanel in this case.
-
Click the Query Accounts button to have InterWorx attempt to connect to the remote server. If the connection fails, make sure you allow direct root login on the remote cPanel server and that you've opened the local and remote SSH ports on your InterWorx server.
-
-
This will eventually display a list of all of the cPanel accounts on the remote server. Choose the cPanel accounts you wish to import by clicking the check box at the start of each row for those accounts.

-
Decide how to handle account ownership. You can select which Reseller account (that already exists on the InterWorx server) owns each account you are importing. The IMPORT option does not actually apply to accounts migrated from cPanel accounts and any accounts marked this way will be owned by the main administrative account on the InterWorx server.
-
You can specify the database server that the accounts use. If you have multiple database servers associated with this InterWorx server, you can specify which one the imported accounts will use.
-
Choose the IP address to assign to the account once imported. By default, all migrated accounts will be assigned to the main shared IP address on the InterWorx server. You can choose an IPv4 or IPv6 address as desired (assuming the server has any available).
-
Ignore the SSL In Use column. InterWorx will automatically import any available SSL certificates for all migrated accounts, but this screen will show that none of the accounts are using SSLs.
-
-
At the bottom of the screen, select Import from the drop-down list to start the migration process. You can also choose to check all or check none of the accounts to help make final selection easier.

-
The import log screen will show the status of each account as it gets imported. If there are any errors, they will be noted here.
Migrate a Single cPanel Account
You can also import individual backups from cPanel servers. You'll need compressed full backups from a cPanel server in order to use this feature. If you don't have root access to the source cPanel server, this is your only option. If the cPanel account has access to backup features, a full backup should be able to be created. For large accounts it is best if the backup is placed on your InterWorx server and restored from there. Smaller accounts can be uploaded from your local computer or device.
-
Log into your InterWorx server as an administrator.
-
Make sure you have a valid full cPanel account backup before you begin.
-
Select Import from the SiteWorx section of the NodeWorx interface.

-
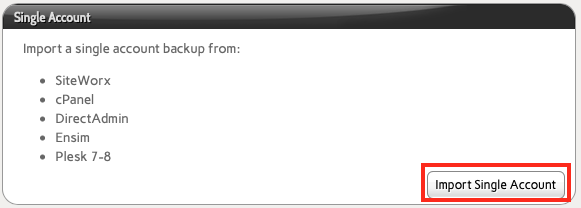
Click the Import Single Account button.
-
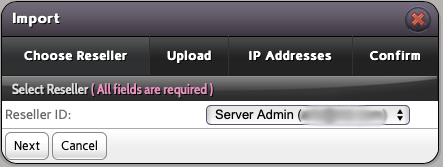
The first thing you need to select is the reseller to own the account you are importing. All accounts must be owned by someone. Choose the main administrative account on the InterWorx server if you're unsure which to pick. If you want this account to eventually be owned by itself, pick the main admin now and then you can go back when the import is done and assign reseller privileges to the account you just imported. Click Next.
-
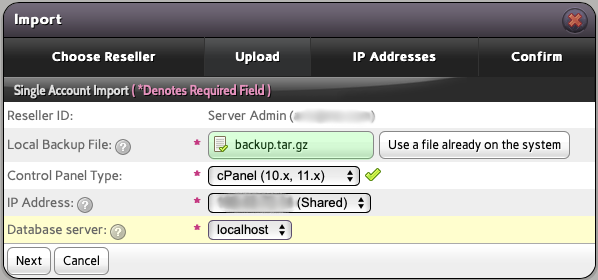
Now select cPanel as the Control Panel Type. Then select the IP Address and the Database Server you want this account to use. For smaller backups, you can upload them directly from your computer on this page. However, for accounts that are 1 GB or more in size, it is better to upload the file to your InterWorx server in a private location. Then you can click Use a file already on the system and type in the full path (with a starting / ) to the backup you uploaded to your server. Once done, click Next. If you attached a backup from your local machine, it will be uploaded to your InterWorx server before going onto the next step.
-
This screen confirms the settings you've chosen and gives you one last chance to back out. Click Import to migrate the account, replacing any account with the same information already on the server or click Cancel to stop and not import the account at all.
-
The page will eventually refresh and tell you if the import was successful or not.
Plesk Linux
⚠️ You should be aware of the following limitations for importing accounts from Plesk servers:
- Only Plesk accounts from Linux servers can be migrated to InterWorx. If the Plesk server is running Windows, then you should create an account on the InterWorx server and manually migrate data instead.
- InterWorx can only mass migrate accounts from very old versions of Plesk (versions 6-8), so you'll need to import Plesk accounts one-by-one instead following the directions below.
- InterWorx can only import unencrypted backups.
- InterWorx doesn't support every feature Plesk does, so Mailman mailing lists, PostgreSQL databases, server-side Java, Ruby on Rails, Docker, and NodeJS will not migrate successfully.
- InterWorx does not currently support DNSSEC, so if domains in Plesk are using that, it should be disabled at the registrar and in the Plesk account prior to migration.
- Web stats will not be migrated.
- Not everything that appears in the home directory for an account on a Plesk server will be migrated to the InterWorx server. Only those items that InterWorx specifically knows it needs will be transferred. So mail and web pages will get moved, but Softaculous or Fantastico script autoinstaller data, as an example, will not.
- MySQL/MariaDB databases and users will be migrated, but they might need to have their names changed. If this happens, InterWorx will note the change in the migration log as well as put a notice into the migrated account for the user to see. This is important because if a script relies on accessing that database, you'll need to manually update the script configuration file with the new details.
- InterWorx will read the Plesk subscriptions and service plans and try to replicate those settings as close as possible, but not all limitations or settings may be possible on the InterWorx server.
This is how you migrate Plesk accounts:
-
Log into your InterWorx server as an administrator.
-
Make sure you have a valid full Plesk account backup before you begin.
-
Select Import from the SiteWorx section of the NodeWorx interface.

-
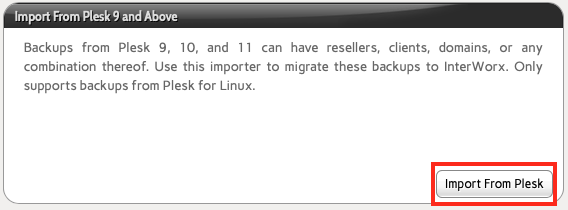
Click Import From Plesk from the available options. Although the description only mentions Plesk 9-11, we can confirm it works up to at least 17.8.
-
You will then be prompted to choose a non-encrypted Plesk backup from your local machine (Browse Files), or you can click Use a file already on the system and type in the full path to the Plesk backup stored on your InterWorx server. Backups over 1 GB should always be uploaded to your local server rather than uploaded through this web form. The path you enter should be a full path, including the initial /. When you are ready, click Continue. The server will upload/decompress the backup in preparation for the next step.

-
InterWorx will show you the details for the account it found in the backup and now you will be able to adjust a few settings. At minimum you should check to make sure the InterWorx Reseller (i.e., account owner), the IP Address and Database server are set to what you want that account to use. You may also want to add or update the Client Email so InterWorx knows who to email concerning the account.

-
Click Continue and InterWorx will start importing the account. Click Cancel to abort this process. When done, InterWorx will inform you of the success or failure.
DirectAdmin
⚠️ You should be aware of the following limitations for importing accounts from DirectAdmin servers:
- InterWorx can only import single account backups.
- InterWorx doesn't support every feature DirectAdmin does, so mailing lists will not migrate successfully.
- InterWorx does not currently support DNSSEC, so if domains in DirectAdmin are using that, it should be disabled at the registrar and in the DirectAdmin account prior to migration.
- Web stats will not be migrated.
- Not everything that appears in the home directory for an account on a DirectAdmin server will be migrated to the InterWorx server. Only those items that InterWorx specifically knows it needs will be transferred. So mail and web pages will get moved, but Softaculous or Fantastico script autoinstaller data, as an example, will not.
- MySQL/MariaDB databases and users will be migrated, but they might need to have their names changed. If this happens, InterWorx will note the change in the migration log as well as put a notice into the migrated account for the user to see. This is important because if a script relies on accessing that database, you'll need to manually update the script configuration file with the new details.
- InterWorx will read the DirectAdmin package and try to replicate those settings as close as possible, but not all limitations or settings may be possible on the InterWorx server. The actual package will not be imported, the account will have its limits individually set.
This is how you migrate DirectAdmin accounts:
-
Log into your InterWorx server as an administrator.
-
Make sure you have a valid full DirectAdmin account backup before you begin.
-
Select Import from the SiteWorx section of the NodeWorx interface.

-
Click the Import Single Account button.

-
The first thing you need to select is the reseller to own the account you are importing. All accounts must be owned by someone. Choose the main administrative account on the InterWorx server if you're unsure which to pick. If you want this account to eventually be owned by itself, pick the main admin now and then you can go back when the import is done and assign reseller privileges to the account you just imported. Click Next.

-
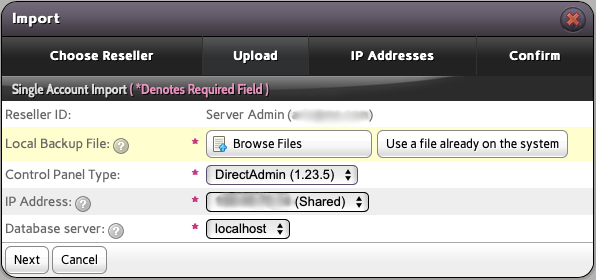
You will then be prompted to choose a compressed DirectAdmin backup from your local machine (Browse Files), or you can click Use a file already on the system and type in the full path to the DirectAdmin backup stored on your InterWorx server. Backups over 1 GB should always be uploaded to your local server rather than uploaded through this web form. The path you enter should be a full path, including the initial /. Make sure the Control Panel Type is set to DirectAdmin and that the IP address and Database server items are set the way you want them. When you are ready, click Next. The server will upload/decompress the backup in preparation for the next step.
-
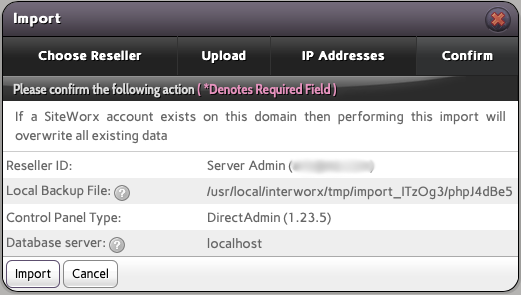
InterWorx will show you the details for the account it found in the backup and now you will be able to confirm the items are correct before you start the import.
-
Click Import and InterWorx will start importing the account. Click Cancel to abort this process. When done, InterWorx will inform you of the success or failure.
InterWorx
✅ As with all automated migration tools, this works best if both the source and destination servers have the same version of InterWorx installed.
At minimum, you will be asked to select the InterWorx Reseller for this account (the account that owns it).
Mass Migrate Accounts from Another InterWorx Server
✅ You'll need gather the following before getting started:
- The source server's hostname or IP address.
- Administrative access to both InterWorx servers.
- The port for SSH on the remote InterWorx server.
- A list of accounts that need to be migrated.
-
Log into your InterWorx server as an administrator.
-
Make sure you have a valid full InterWorx account backup before you begin.
-
Select Import from the SiteWorx section of the NodeWorx interface.

-
Click the Import Mass Transfer button.

-
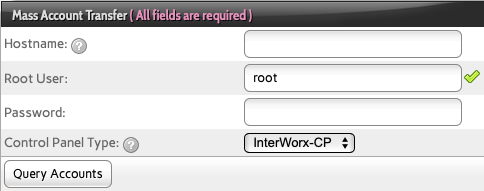
Enter the details needed to access the remote InterWorx server.
-
Enter the Hostname or IP address of the remote cPanel server. If the remote InterWorx server runs SSH on a port other than 22, add a colon followed by the port number without any spaces.
-
InterWorx can only access the remote InterWorx server if it allows direct password login as the Root User. If needed, ensure you permit direct root logins on the remote server from your InterWorx server.
-
Type in the root Password for the remote server.
-
The Control Panel Type should be set to cPanel in this case.
-
Click the Query Accounts button to have InterWorx attempt to connect to the remote server. If the connection fails, make sure you allow direct root login on the remote InterWorx server and that you've opened the local and remote SSH ports on your InterWorx server.
-
-
This will eventually display a list of all of the InterWorx accounts on the remote server. Choose the accounts you wish to import by clicking the check box at the start of each row for those accounts.

-
Decide how to handle account ownership. You can select which Reseller account (that already exists on the InterWorx server) owns each account you are importing. The IMPORT option allows you to import resellers and reseller settings for the selected accounts from the remote server.
-
You can specify the database server that the accounts use. If you have multiple database servers associated with this InterWorx server, you can specify which one the imported accounts will use.
-
Choose the IP address to assign to the account once imported. By default, all migrated accounts will be assigned to the main shared IP address on the InterWorx server. You can choose an IPv4 or IPv6 address as desired (assuming the server has any available).
-
If the account is using an SSL, it will be noted in the SSL In Use column. The account's SSL will be imported from the remote server and installed and configured on the local server.
-
-
At the bottom of the screen, select Import from the drop-down list to start the migration process. You can also choose to check all or check none of the accounts to help make final selection easier.

-
The import log screen will show the status of each account as it gets imported. If there are any errors, they will be noted here.
Migrate a Single InterWorx Account
To migrate a single account between InterWorx servers, follow these steps:
-
Log into your InterWorx server as an administrator.
-
Make sure you have a valid full InterWorx account backup before you begin.
-
Select Import from the SiteWorx section of the NodeWorx interface.

-
Click the Import Single Account button.

-
The first thing you need to select is the reseller to own the account you are importing. All accounts must be owned by someone. Choose the main administrative account on the InterWorx server if you're unsure which to pick. If you want this account to eventually be owned by itself, pick the main admin now and then you can go back when the import is done and assign reseller privileges to the account you just imported. Click Next.

-
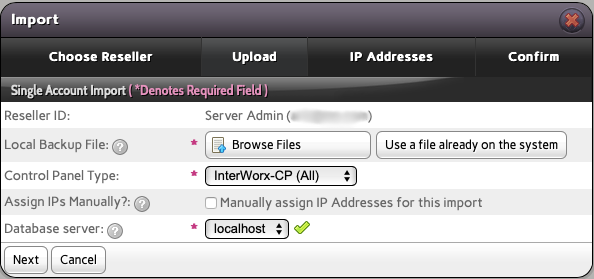
Now select InterWorx as the Control Panel Type. Then select if you want to Assign IPs Manually and the Database Server you want this account to use. For smaller backups, you can upload them directly from your computer on this page. However, for accounts that are 1 GB or more in size, it is better to upload the file to your InterWorx server in a private location. Then you can click Use a file already on the system and type in the full path (with a starting / ) to the backup you uploaded to your server. Once done, click Next. If you attached a backup from your local machine, it will be uploaded to your InterWorx server before going onto the next step.
-
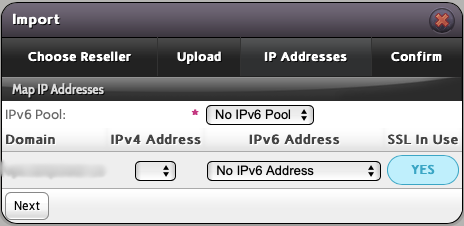
If you chose to Assign IPs Manually in the previous step, you will be presented with the IP address screen now. If you didn't select that in the previous step, skip to the next step. Select the IP address you want the account to use (also selecting the IPv6 address pool if necessary) and click Next to continue.
-
The final screen confirms the settings you've chosen and gives you one last chance to back out. Click Import to migrate the account, replacing any account with the same information already on the server or click Cancel to stop and not import the account at all.
-
The page will eventually refresh and tell you if the import was successful or not.
Post-Migration Investigation
While InterWorx will take care of a lot of data migration tasks, there are still a few things that you or your clients may need to do afterwards. Here are a list of some things you should investigate or change as needed:
- DNS changes: Your clients may need to update the nameservers that their domains point to or their custom nameserver IP addresses so that they point to your InterWorx server. Several things like mail and the user's website may not work properly until DNS propagation is complete.
- Check the website: Your clients should check to make sure their website works as expected after the transfer. Don't forget that if the migration changed the name of a database or database user that a web script relies on, that will need to be updated manually in the web script's database configuration file.
- Try logging into mail: Not only may users need to adjust the mail account connection details in their email clients, but they should also ensure that all mail they expect is in the account and that new mail is arriving.
- Check other services like FTP to make sure they work as expected, too.
- You may need to manually copy over some additional data from the source server (like Softaculous or Fantastico information if those things are in use on both servers).
⚠️ Do not delete the data from the source server until you are sure the import was successful and everything is working properly.
Congratulations on your successful migration!