Configure Incoming Mail for HostDime's Email Filter Service
Configuring a domain to use HostDime's Email Filter service is easy once we've informed you that the service is prepared for your domain(s).
There are really only three steps:
- Change the domain's MX record(s) to point to HostDime's Premium Antispam.
- Ensure that the local mail server is still configured to receive mail.
- Ensure that our service is exempted from SPF checks by your local mail server.
Here are some specific directions for how to accomplish these tasks on some common platforms.
From WHM
Log into WHM and make the following changes to the DNS record for that domain:
- Click Edit MX Record in the WHM sidebar.
- Select the domain to adjust and click Edit.
- Typically, the MX records will point to the local server, like
this:
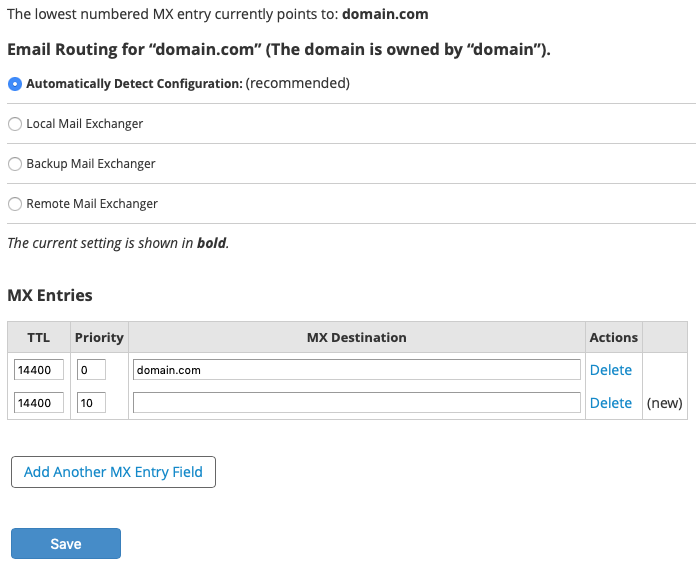
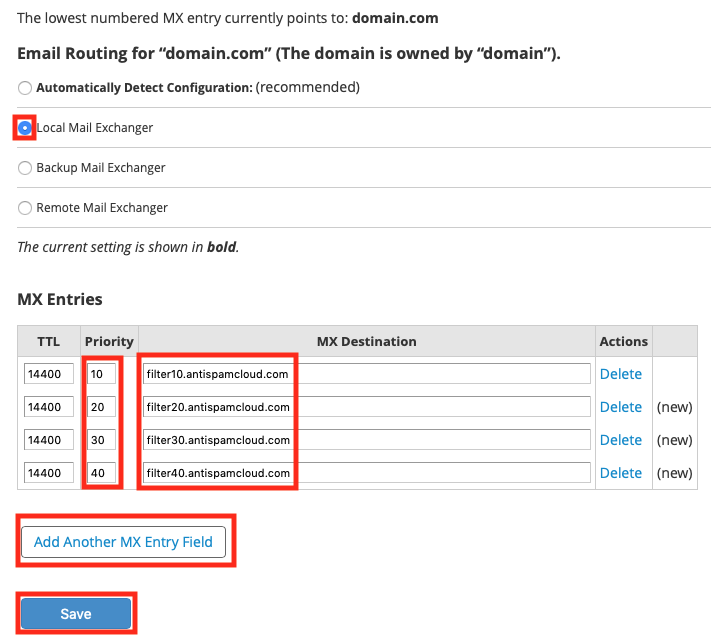
Now you want to edit the MX records in the following ways (replacing the
existing records):
-
Select the Local Mail Exchanger for the Email Routing section.
⚠️ If you don't select Local Mail Exchanger, then cPanel will stop handling all mail for this domain locally and will refuse mail when Spam Expert's servers try to deliver.
-
Under the MX Entries section, click Add Another MX Entry Field 3 times if there aren't already 4 fields being shown.
-
Edit the Priority fields so the first record is 10, the next is 20, then 30 and finally 40.
-
Edit the MX Destination fields so that the priority 10 record is filter10.antispamcloud.com, the 20 record is filter20.antispamcloud.com, 30 is filter30.antispamcloud.com and 40 is filter40.antispamcloud.com.
⚠️ Normally, if you were editing a raw DNS zone, you'd want to end each MX Destination with a period, but that is not required when editing the record in WHM or cPanel.
-
Click Save to commit these changes.
WHM will now reload or restart the DNS server as appropriate.
ℹ️ The mail records are changed immediately and many mail servers will now start delivering mail to HostDime's Premium Antispam, but due to caching, it is possible that some mail servers could continue to deliver mail to the local mail server for up to or just over the amount of time specified by the TTL value (4 hours by default).
Disable Local SPF Checks for Our Email Filter Servers
To ensure that clean mail being delivered from our email filtering servers doesn't get accidentally flagged as spam or failed SPF checks, we need to configure Exim (the local mail server) to not run those checks for our service's mail servers. Follow the directions below to accomplish this.
- If you aren't already logged into WHM as root, do so now.
- Type exim into the search box at the top of the sidebar.
- Click on Exim Configuration Manager. This will bring up the
Basic Editor.
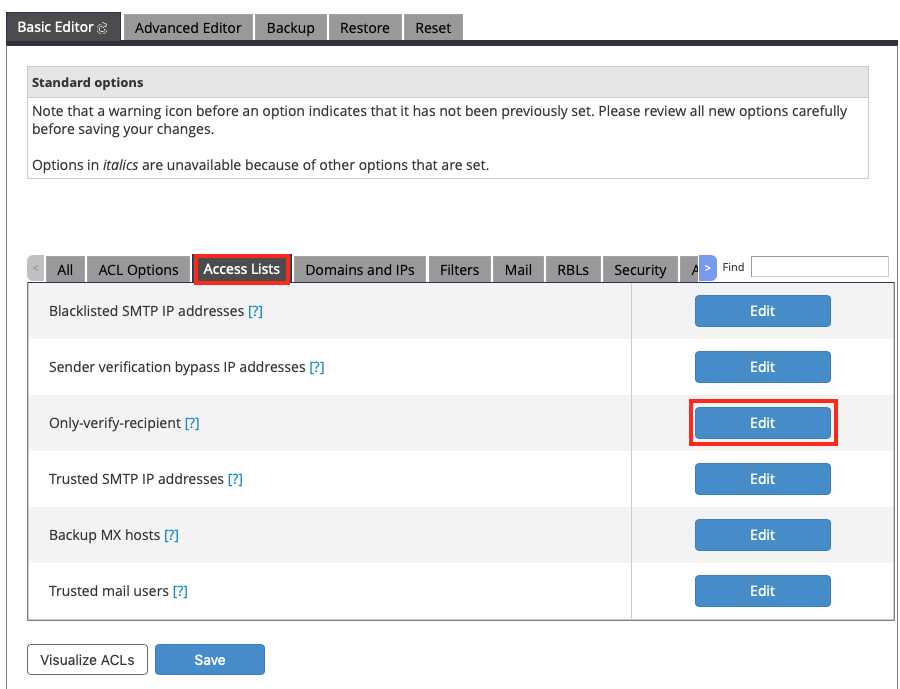
- Click on the Access Lists tab.
- Click the Edit button across from the Only Verify Recipient access list.
- A new box will pop up, enter delivery.antispamcloud.com on a line all by itself.
- Click the Save button below the box.
- Click the Save button at the bottom of the Basic Editor.
Exim will be restarted and your configuration is now complete.
⚠️ Troubleshooting
If you still have issues with Exim denying messages from our servers due to failed SPF checks, follow the steps above, but paste in the following list of IP addresses into the Only verify recipient box, one per line, and save changes.
delivery.antispamcloud.com IPs:
Click here to expand list
185.201.16.201
185.201.17.201
185.201.18.201
185.201.19.201
108.59.11.79
88.99.245.49
94.130.238.210
138.201.65.23
88.99.25.231
195.201.61.177
138.201.141.136
38.89.254.36
38.89.254.38
38.89.254.79
38.89.254.152
38.89.254.80
38.89.254.81
38.89.254.82
38.89.254.150
38.89.254.151
38.89.254.154
38.89.254.155
38.89.254.156
38.89.254.157
199.115.114.223
199.115.117.1
199.115.113.161
162.210.198.139
46.165.232.196
46.165.232.197
154.61.135.19
154.61.135.20
154.61.135.21
154.61.135.22
212.7.192.86
212.32.246.15
62.212.72.235
85.17.23.118
85.17.23.119
81.171.15.183
85.17.76.141
85.17.23.2
81.17.56.93
81.17.62.140
81.17.62.141
81.17.62.142
81.17.62.145
81.17.56.160
95.216.33.117
95.216.33.118
95.216.36.251
95.216.36.252
95.216.37.109
95.216.37.110
95.216.37.111
95.216.37.113
138.201.138.133
138.201.140.156
138.201.192.37
138.201.192.38
138.201.61.103
138.201.61.104
138.201.61.135
138.201.61.138
138.201.61.140
138.201.61.142
162.210.198.115
162.210.193.232
154.61.81.57
154.61.81.58
154.61.135.25
178.63.55.124
188.138.125.29
188.138.56.27
188.138.56.29
192.69.16.127
192.69.16.130
198.7.58.151
198.7.58.152
198.7.58.153
198.7.58.154
198.7.58.155
199.115.117.7
207.244.83.249
209.126.110.250
209.126.110.251
209.126.122.18
209.58.136.65
212.32.243.83
212.32.233.198
217.118.19.158
217.20.113.37
37.48.65.165
31.204.150.41
31.204.154.235
31.204.154.236
31.204.154.237
31.204.154.238
31.204.154.86
31.204.155.103
31.204.155.105
31.204.155.116
46.165.209.232
46.165.209.5
46.165.217.141
46.165.217.142
46.165.222.180
46.165.223.16
46.165.223.3
46.165.224.87
5.79.65.71
5.79.65.85
5.79.65.86
5.79.65.88
5.79.86.40
5.79.86.41
5.79.86.42
5.79.72.138
5.79.72.139
7.48.65.165
69.64.57.52
69.64.57.56
69.64.57.60
69.64.57.61
78.46.59.153
82.192.64.142
82.192.64.145
85.17.178.207
85.25.176.214
85.25.237.172
85.25.237.173
85.25.237.90
85.25.237.91
94.75.244.162
94.75.244.163
94.75.244.176
94.130.134.223
94.130.134.226
94.130.139.116
94.130.140.62
95.211.160.147
95.211.121.203
95.211.233.204
95.211.233.206
154.61.81.53
154.61.81.54
You may also want to check your server's firewall to make sure it doesn't block our servers either.
From cPanel
It is also possible to change the MX records and routing from cPanel itself for those accounts that have the Zone Editor and Email Delivery features enabled.
-
Log into the cPanel account that controls the domain that you want to change the mail records for.
-
Click on Zone Editor in the Domains section of cPanel.
-
Click on Manage next to the domain you want to adjust.
-
If there are many records displayed, you can select MX in the Filters section above the list to only show existing MX records.
-
Most cPanel accounts will have a single MX record set up with a priority of zero, but some may already have more than one record with different priorities set up.
-
You can either choose to edit the existing MX record(s) or delete them and create new ones, but it is safest to click on Edit.
-
In the existing record you will want to adjust both the **Priority **and Destination.

- The first MX record should have a priority of 10 (to make the priority match the name of the mail server).
- The Destination should be: filter10.antispamcloud.com.
- Click Save Record to apply the change.
-
To add another MX record, click the small down-arrow next to the Add Record button and select Add MX Record from the drop-down menu.
-
Most fields should already be configured properly, but the Priority for the second record should be 20 and the Destination should be filter20.antispamcloud.com.
-
Click Save Record to apply the new MX record.
-
Repeat steps 8-10 to create MX records for filter30.antispamcloud.com and filter40.antispamcloud.com.
⚠️ cPanel typically queues changes that may affect the availability of services, so depending on the circumstances it may take up to 5 minutes for the changes made in cPanel to become active. Once that is done, many mail servers will now start delivering mail to HostDime's Premium Antispam, but due to caching, it is possible that some mail servers could continue to deliver mail to the local mail server for up to or just over the amount of time specified by the TTL value (4 hours by default).
-
Now we need to make sure mail is routed properly on the local server. Click the home icon (which looks like 9 squares) to go back to the main cPanel screen.
-
Click on Email Routing in the Email section of cPanel.
-
Click Local Mail Exchanger so that cPanel will continue to deliver mail to the locally configured accounts when it comes in.
-
Click Change to apply the new setting immediately.
Mail for this domain will now be sent to HostDime's Email Filter service, it will filter the mail and then deliver the mail to the local server.
You should also disable spam and SPF checks for our mail servers, but for that you (or your web host) will need to log into WHM as root to make some configuration changes.
To see what those steps are, switch to the From WHM tab above and scroll down near the bottom to the Disable Local SPF Checks for Our Email Filter Servers section and follow those directions.
InterWorx - From NodeWorx as Admin
The following steps should be handled by an administrator account:
-
Log into NodeWorx.
-
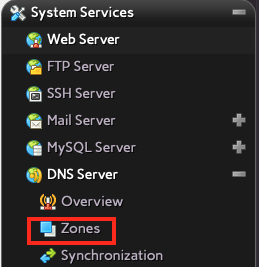
In the DNS Server section, select Zones.
-
Find the DNS zone you want to edit and click the Records button.
-
Check to see if the zone contains one or more MX (mail) records. On InterWorx, most domains will likely have at least one record with a preference number (priority) of 10.
-
If at least one MX record exists, Edit the record with the lowest priority number first (which is probably 10). If no records exist, you need to make some. Skip to step 7.
-
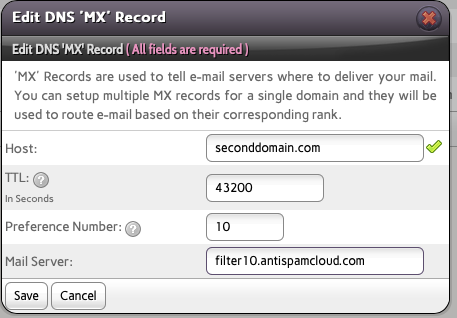
If the lowest priority MX record you are editing is some number other than 10, change the Preference Number to 10 and the Mail Server to filter10.antispamcloud.com. Click Save to save the record changes. If the zone has more existing MX records, repeat this process with filter20.antispamcloud.com - filter40.antispamcloud.com for MX records with similar Preference Numbers. If you run out of existing MX records, continue to the next step and continue creating MX records until the zone has 4 of them, total.
-
Create a new MX record by selecting MX from the Add a new drop-down list to the top-left of the DNS zone records list and clicking Go. Fill in the Preference Number to match the lowest Mail Server record that doesn't already exist and Save changes. Repeat this until the zone has a total of 4 MX records as follows:
Preference Number (Priority) Mail Server Domain 10 filter10.antispamcloud.com yourdomain.com 20 filter20.antispamcloud.com yourdomain.com 30 filter30.antispamcloud.com yourdomain.com 40 filter40.antispamcloud.com yourdomain.com Replace "yourdomain.com" with whatever domain you are editing.
-
InterWorx will automatically refresh the DNS zone in the DNS service after you add or edit each record.
-
Now you need to double check that mail is still set to be delivered locally on this server for the domain you just edited. If mail is handled by your InterWorx server, you'll need to log into the SiteWorx account that owns the domain you've just edited. If mail is not handled by your InterWorx server, then the user should make sure their remote mail server is still set to accept mail locally.
-
Under SiteWorx select Accounts.

-
Find the user account that owns the domain you just edited and click on the SiteWorx button next to that account. This will immediately log you into the user's account.

-
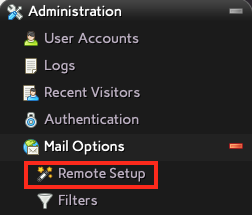
In the Administration section, find Mail Options and click Remote Setup.
-
Under Local Delivery Status find the domain you edited earlier. Make sure that Status is listed as Enabled. If it is enabled, there is nothing you need to do. If it is Disabled, click the Enable button to the left of the domain Host name.

-
The last step is to try to whitelist our anti-spam servers so they don't get checked for SPF or labeled as spam.
-
Log out of the SiteWorx and you should be back in NodeWorx again.
-
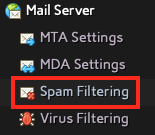
Under System Services look for Mail Server and then select Spam Filtering.
-
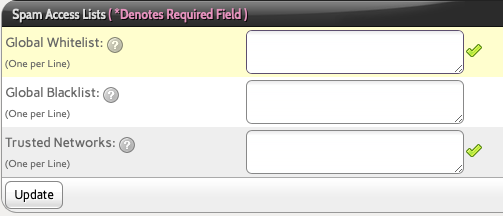
Put delivery.antispamcloud.com or the following list of IP in the trusted networks field and click Update to apply changes.
delivery.antispamcloud.com IPs:
Click here to expand list
185.201.16.201
185.201.17.201
185.201.18.201
185.201.19.201
108.59.11.79
88.99.245.49
94.130.238.210
138.201.65.23
88.99.25.231
195.201.61.177
138.201.141.136
38.89.254.36
38.89.254.38
38.89.254.79
38.89.254.152
38.89.254.80
38.89.254.81
38.89.254.82
38.89.254.150
38.89.254.151
38.89.254.154
38.89.254.155
38.89.254.156
38.89.254.157
199.115.114.223
199.115.117.1
199.115.113.161
162.210.198.139
46.165.232.196
46.165.232.197
154.61.135.19
154.61.135.20
154.61.135.21
154.61.135.22
212.7.192.86
212.32.246.15
62.212.72.235
85.17.23.118
85.17.23.119
81.171.15.183
85.17.76.141
85.17.23.2
81.17.56.93
81.17.62.140
81.17.62.141
81.17.62.142
81.17.62.145
81.17.56.160
95.216.33.117
95.216.33.118
95.216.36.251
95.216.36.252
95.216.37.109
95.216.37.110
95.216.37.111
95.216.37.113
138.201.138.133
138.201.140.156
138.201.192.37
138.201.192.38
138.201.61.103
138.201.61.104
138.201.61.135
138.201.61.138
138.201.61.140
138.201.61.142
162.210.198.115
162.210.193.232
154.61.81.57
154.61.81.58
154.61.135.25
178.63.55.124
188.138.125.29
188.138.56.27
188.138.56.29
192.69.16.127
192.69.16.130
198.7.58.151
198.7.58.152
198.7.58.153
198.7.58.154
198.7.58.155
199.115.117.7
207.244.83.249
209.126.110.250
209.126.110.251
209.126.122.18
209.58.136.65
212.32.243.83
212.32.233.198
217.118.19.158
217.20.113.37
37.48.65.165
31.204.150.41
31.204.154.235
31.204.154.236
31.204.154.237
31.204.154.238
31.204.154.86
31.204.155.103
31.204.155.105
31.204.155.116
46.165.209.232
46.165.209.5
46.165.217.141
46.165.217.142
46.165.222.180
46.165.223.16
46.165.223.3
46.165.224.87
5.79.65.71
5.79.65.85
5.79.65.86
5.79.65.88
5.79.86.40
5.79.86.41
5.79.86.42
5.79.72.138
5.79.72.139
7.48.65.165
69.64.57.52
69.64.57.56
69.64.57.60
69.64.57.61
78.46.59.153
82.192.64.142
82.192.64.145
85.17.178.207
85.25.176.214
85.25.237.172
85.25.237.173
85.25.237.90
85.25.237.91
94.75.244.162
94.75.244.163
94.75.244.176
94.130.134.223
94.130.134.226
94.130.139.116
94.130.140.62
95.211.160.147
95.211.121.203
95.211.233.204
95.211.233.206
154.61.81.53
154.61.81.54
InterWorx - From SiteWorx as User
If you are the user who owns the domain you're trying edit, follow these steps:
-
Log into SiteWorx.
-
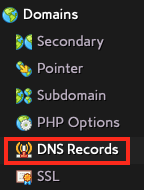
In the Hosting Features section, look for Domains and select DNS Records. If you don't see DNS Records then your account may not have access to edit your DNS zone file. Contact your web host for assistance.
-
Choose View Records next to the domain name you want to adjust the mail records for.

-
Check to see if the zone contains one or more MX (mail) records. On InterWorx, most domains will likely have at least one record with a preference number (priority) of 10.
-
If at least one MX record exists, Edit the record with the lowest priority number first (which is probably 10). If no records exist, you need to make some. Skip to step 7.
-
If the lowest priority MX record you are editing is some number other than 10, change the Preference Number to 10 and the Mail Server to filter10.antispamcloud.com. Click Save to save the record changes. If the zone has more existing MX records, repeat this process with filter20.antispamcloud.com - filter40.antispamcloud.com for MX records with similar Preference Numbers. If you run out of existing MX records, continue to the next step and continue creating MX records until the zone has 4 of them, total.

-
Create a new MX record by selecting MX from the Add a new drop-down list to the top-left of the DNS zone records list and clicking Go. Fill in the Preference Number to match the lowest Mail Server record that doesn't already exist and Save changes. Repeat this until the zone has a total of 4 MX records as follows:
Preference Number (Priority) Mail Server Domain 10 filter10.antispamcloud.com yourdomain.com 20 filter20.antispamcloud.com yourdomain.com 30 filter30.antispamcloud.com yourdomain.com 40 filter40.antispamcloud.com yourdomain.com Replace "yourdomain.com" with whatever domain you are editing.
-
InterWorx will automatically refresh the DNS zone in the DNS service after you add or edit each record.
-
Now you need to double check that mail is still set to be delivered locally on this server for the domain you just edited.
-
Go to Administration and look for Mail Options and then click on Remote Setup.

-
Under Local Delivery Status find the domain you edited earlier. Make sure that Status is listed as Enabled. If it is enabled, there is nothing you need to do. If it is Disabled, click the Enable button to the left of the domain Host name.

-
The last step is to try to whitelist our anti-spam servers so they don't get checked for SPF or labeled as spam. Contact your web host and tell them to follow from step 15 onward in the NodeWorx tab on this page.
From Plesk
- Log into Plesk.
- Make sure mail service is enabled for the domain you want to change.
- Click on Domains in the sidebar to show available domains.
- Click on the domain name itself to be taken to the Plesk domain management interface.
- Click on Mail Settings.
- Make sure Activate mail service on this domain is enabled. If not, check this item and Apply changes.
- Now we can adjust the MX records for this domain.
- Click on Domains in the sidebar to show available domains.
- Click on the domain name itself to be taken to the Plesk domain management interface.
- Click on DNS Settings and you will be shown a list of all of the DNS zone entries for that domain.
- Find the first MX record and click on it to edit the settings.
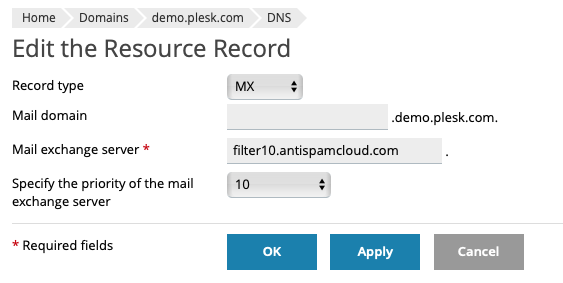
- If needed, change the priority to 10 and set the Mail exchange server to filter10.antispamcloud.com (no period is required at the end of the server record).
- Click Apply to save the changes.
- Add or edit more MX entries as needed to add priority 20-40 records pointing to filter20.antispamcloud.com — filter40.antispamcloud.com
Once done, mail will be filtered by HostDime's Email Filter service and then delivered to the local mail server.
From Other Types of Servers
If you aren't using cPanel or Plesk, then you will need to look up the proper method for editing DNS records for the server.
-
Edit the DNS zone for the domain you want to switch to HostDime's Premium Antispam.
-
Adjust the serial number in the SOA record if you are manually making changes to ensure that your DNS server detects the changes to the zone and starts serving them.
-
Add or edit MX records for the domain so they point to the following:
Domain Record Type Priority Destination YOURDOMAIN.COM. MX 10 filter10.antispamcloud.com. YOURDOMAIN.COM. MX 20 filter20.antispamcloud.com. YOURDOMAIN.COM. MX 30 filter30.antispamcloud.com. YOURDOMAIN.COM. MX 40 filter40.antispamcloud.com. Replace YOURDOMAIN.COM above with the actual domain name to be filtered. Make sure it ends with a period.
-
Save changes.
-
Reload or restart your DNS service.
-
Make sure your local mail server is still configured to send and receive mail for this domain, even though the MX records are no longer pointed to the local mail server.
Now you will want to make sure that delivery.antispamcloud.com or the following list of IPs are exempted from your local mail server's spam and SPF checks (if it does any).
delivery.antispamcloud.com IPs:
Click here to expand list
185.201.16.201
185.201.17.201
185.201.18.201
185.201.19.201
108.59.11.79
88.99.245.49
94.130.238.210
138.201.65.23
88.99.25.231
195.201.61.177
138.201.141.136
38.89.254.36
38.89.254.38
38.89.254.79
38.89.254.152
38.89.254.80
38.89.254.81
38.89.254.82
38.89.254.150
38.89.254.151
38.89.254.154
38.89.254.155
38.89.254.156
38.89.254.157
199.115.114.223
199.115.117.1
199.115.113.161
162.210.198.139
46.165.232.196
46.165.232.197
154.61.135.19
154.61.135.20
154.61.135.21
154.61.135.22
212.7.192.86
212.32.246.15
62.212.72.235
85.17.23.118
85.17.23.119
81.171.15.183
85.17.76.141
85.17.23.2
81.17.56.93
81.17.62.140
81.17.62.141
81.17.62.142
81.17.62.145
81.17.56.160
95.216.33.117
95.216.33.118
95.216.36.251
95.216.36.252
95.216.37.109
95.216.37.110
95.216.37.111
95.216.37.113
138.201.138.133
138.201.140.156
138.201.192.37
138.201.192.38
138.201.61.103
138.201.61.104
138.201.61.135
138.201.61.138
138.201.61.140
138.201.61.142
162.210.198.115
162.210.193.232
154.61.81.57
154.61.81.58
154.61.135.25
178.63.55.124
188.138.125.29
188.138.56.27
188.138.56.29
192.69.16.127
192.69.16.130
198.7.58.151
198.7.58.152
198.7.58.153
198.7.58.154
198.7.58.155
199.115.117.7
207.244.83.249
209.126.110.250
209.126.110.251
209.126.122.18
209.58.136.65
212.32.243.83
212.32.233.198
217.118.19.158
217.20.113.37
37.48.65.165
31.204.150.41
31.204.154.235
31.204.154.236
31.204.154.237
31.204.154.238
31.204.154.86
31.204.155.103
31.204.155.105
31.204.155.116
46.165.209.232
46.165.209.5
46.165.217.141
46.165.217.142
46.165.222.180
46.165.223.16
46.165.223.3
46.165.224.87
5.79.65.71
5.79.65.85
5.79.65.86
5.79.65.88
5.79.86.40
5.79.86.41
5.79.86.42
5.79.72.138
5.79.72.139
7.48.65.165
69.64.57.52
69.64.57.56
69.64.57.60
69.64.57.61
78.46.59.153
82.192.64.142
82.192.64.145
85.17.178.207
85.25.176.214
85.25.237.172
85.25.237.173
85.25.237.90
85.25.237.91
94.75.244.162
94.75.244.163
94.75.244.176
94.130.134.223
94.130.134.226
94.130.139.116
94.130.140.62
95.211.160.147
95.211.121.203
95.211.233.204
95.211.233.206
154.61.81.53
154.61.81.54
After making these changes, try sending some email to your newly configured domain. If you run into problems, please feel free to contact us any time.
⚠️ Important!
Some mail servers may continue to send mail directly to your mail server for a few hours (depending on your MX record TTL value) after the change. This is normal. Once several hours have passed, the amount of spam should be greatly reduced.
Also, it is not uncommon for some spammers to completely ignore the MX records and try to deliver mail directly to your mail server to try to avoid mail filtering services like ours. If you have every domain on your server filtered through our service, contact us, and we can help you configure your mail server to only permit incoming mail connections from our mail servers. Alternately, follow these directions to filter out that direct spam for only that specific domain.