Set up Email in Outlook
This article covers setting up an email account in Outlook for Windows. Select the expandable section below that corresponds to the version of Outlook you are using.
Outlook 2019 or 365
Launch Outlook and follow these steps to set up your email account:
-
Click on File in the menu bar.

-
On the File screen, click on the + Add Account button to start adding a new account.

-
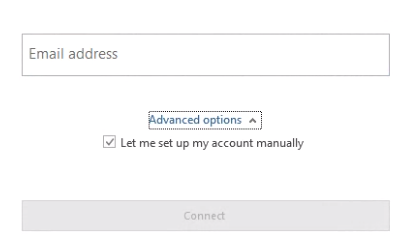
A new box will pop up and ask you to enter your email address. Type it in and click Connect. Go to step 4 if you do this. If you want to learn about advanced settings, read on.
-
Alternately, you can click Advanced options and then click the Let me set up my account manually checkbox and then click Connect. If so you will be asked to specify what type of account you want to set up. Click on IMAP or POP depending on which protocol you want to use. Then continue to step 4.
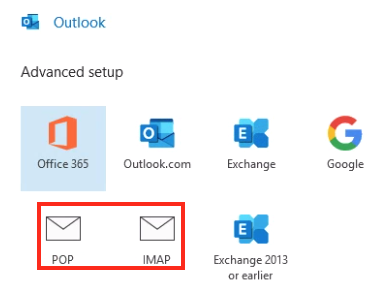
✅ If you'd like to understand more about the differences between the IMAP and POP protocols. please see this article.
You will not be able to change this selection later once the account is set up. If you are unsure what to pick, choose IMAP.
-
-
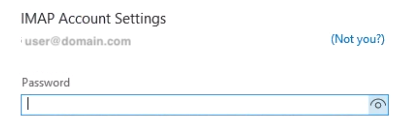
Outlook will try to start figuring out on its own the email account settings. It will likely prompt you for your password next if it thinks it has figured out the correct settings. Enter your password and submit it. If it works, skip to step 7.
-
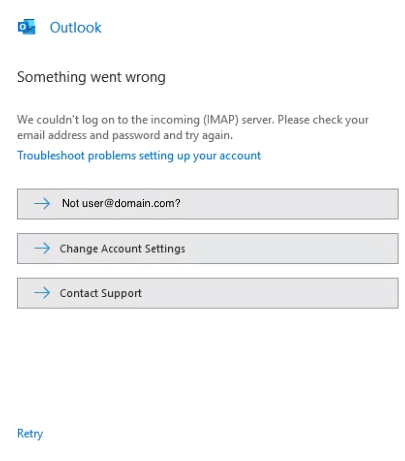
If you run into any issues, click Change Account Settings.
-
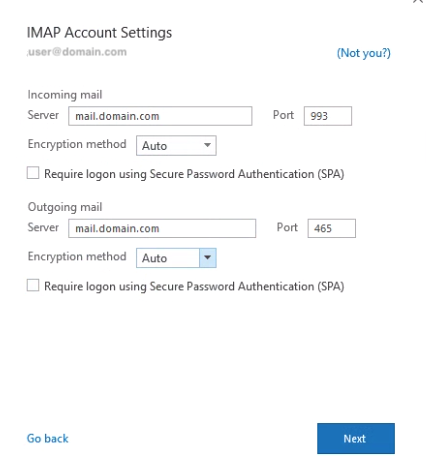
Enter your email account details or correct them as needed:
-
The Incoming mail Server is typically your server's hostname, your domain name or mail.yourdomain.com.
-
Depending on your choice of IMAP or POP protocol, Outlook will automatically fill in the standard secure incoming port. You shouldn't need to change this unless you are trying to make an insecure connection.
-
The Encryption method is best set to Auto.
-
Do not check Require login using Secure Password Authentication (SPA) unless you are certain your mail server supports it (not many do as it is a proprietary Microsoft feature).
-
For the Outgoing mail Server you typically use the same hostname as you did in step a above, but some mail servers might require a separate hostname. If so, check with your email provider.
-
The Port will also be automatically set by Outlook. You may not need to change it, but if you have problems, you may want to try the alternate port 587.
-
Encryption method should also be set to Auto.
-
Once again you probably should not check Require login using Secure Password Authentication (SPA) unless you are certain you need it for outgoing connections.
-
Click Next when done.
-
-
Outlook with attempt to connect and if it works, you will be told that the account is set up. If you run into problems repeat from step 5 above and double check that your mail settings are correct.
✅ Congratulations, you've finished setting up your email account!
Outlook 2016-2010
✅ The screenshots in this article show Outlook 2016, but the process is the same for Outlook 2010-2016.
After your start Outlook, follow these steps:
-
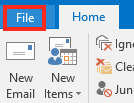
Click on File in the menu bar.
-
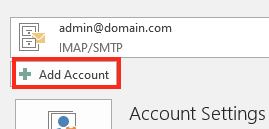
The screen will change. Click on + Add Account.
-
Outlook will then present you a simplified email account information screen. If you enter your email address and password here, Outlook will try to figure out the other settings it needs automatically. Unfortunately, this isn't likely to work well with many custom email accounts like the ones on your own server, so it is recommended that instead of filling out the information on this screen you choose Manual setup or additional server types and then click the Next > button.

-
Select POP or IMAP and click Next >.

-
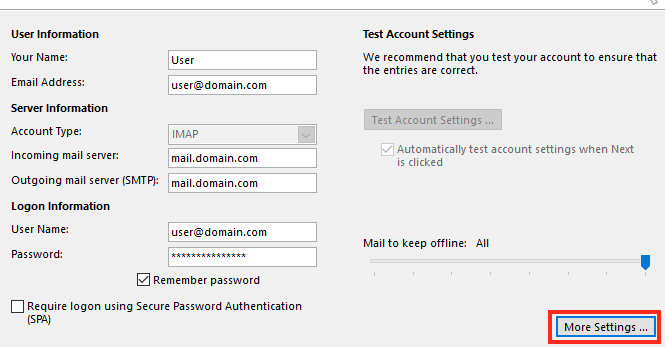
Now you will need to enter some information about your account:
-
Under the User Information section, type the name you want people to see when they get mail from you in the Your Name field.
-
Enter your Email Address including the domain name.
-
In the Server Information section, first select the Account Type protocol. You can choose IMAP or POP.
✅ If you'd like to understand more about the differences between the IMAP and POP protocols. please see this article.
You will not be able to change this selection later once the account is set up. If you are unsure what to pick, choose IMAP.
-
The Incoming mail server is typically your server's hostname, your domain name or mail.yourdomain.com.
-
Outgoing mail server is often the same as your incoming mail server, but in some rare cases they might be different.
-
Under the Login Information section, you should enter your email account User Name. This is frequently your full email address, but sometimes it can be the part of your email address that appears before the @.
-
Enter your email account Password and you can check the box next to Remember password if you would like Outlook to not prompt you to re-enter your password every time it tries to send or receive mail.
-
Leave the checkbox next to Require login using Secure Password Authentication (SPA) unchecked. SPA is a proprietary Microsoft authentication method that few mail servers are configured to support. This setting is not the same as secure authentication via SSL/TLS (which you should use).
-
On the right side of this box if you are using IMAP, you can drag the slider under Mail to keep offline: item to control how much mail Outlook downloads and stores locally from this account. The default is for Outlook to store copies of all mail locally (as well as on the server).
⚠️ If Outlook has downloaded all of the mail locally, you will be able to read it or work with attachments even if you don't currently have internet access.
If you are using a machine with limited storage space (like a laptop, for example), you can save disk space by curtailing how much mail Outlook stores locally. The downside is that you won't be able to read mail or work with attachments if you don't have an active internet connection.
-
There are some additional settings to be filled out before Outlook will be able to send or receive mail. Click the More Settings... button to bring up a new window with some additional options.
-
-
At the top of this new window, there are some tabs. Click the Outgoing Sever tab.
-
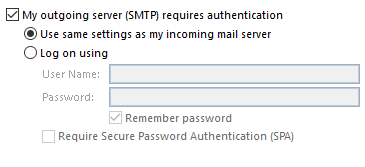
Now you can set some additional outgoing mail server options:
-
Make sure that My outgoing server (SMTP) requires authentication is checked. While some mail servers may use POP before SMTP for authentication, most do not due to the potential security concerns. Checking this will make sure that Outlook tries password authentication before attempting to send mail.
-
Typically, the login information needed for outgoing mail service is exactly the same as what you use for incoming mail. If this is the case for your account, make sure Use same settings as my incoming mail server is selected.
-
If not, select Log on using and enter the outgoing mail server User Name and Password for this account. Choose whether you want Outlook to Remember password or not and you should probably leave SPA unchecked.
-
-
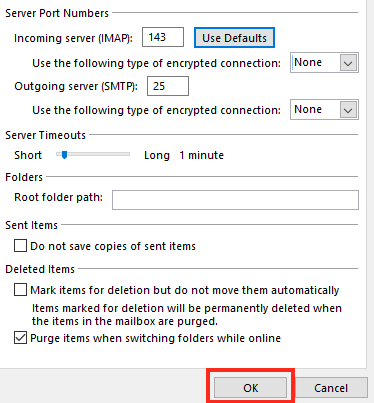
Click the Advanced tab at the top of this window to see the inbound and outbound port options and other special settings:
-
The section you'll want to review carefully is the Server Port Numbers area.
-
By default the Incoming server and Outgoing server will be set to the standard insecure port numbers. If you want to send and receive mail without encrypted connections to and from the mail server, then you can leave everything set as it is. This is not recommended.
⚠️ Some ISPs block connections to port 25, so your mail server may have an alternate port number you can use to make insecure
-
If you want to send mail using a secure connection, then set the incoming port to 993 if you are using IMAP or 995 if you are using POP. Set the outgoing server to 587 or 465 if 587 doesn't work for you.
-
-
Click OK to apply these settings.
-
You'll be back at the original screen. Click OK again to apply all of the changes.
✅ If everything was successful your email account should now be set up. Be sure to try sending a message through that email account to make sure outbound connections work as well as incoming ones.
Outlook 2007 and 2003
This article covers how to set up your email in Outlook 2007. Start Outlook and then follow these steps:
-
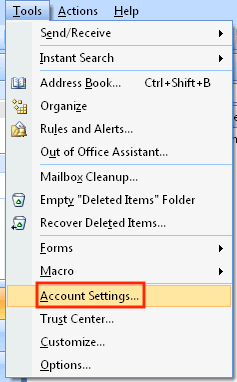
Navigate to Account Settings under the Tools tab.
-
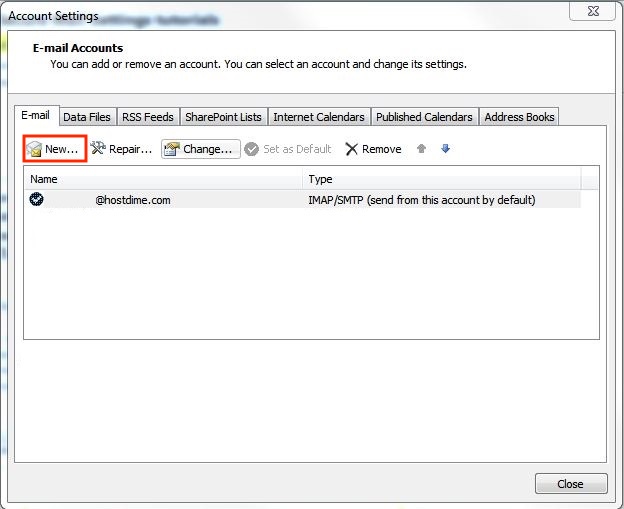
Click New… in the E-mail tab.
-
Select the first radio button to set up a POP or IMAP account and click Next > to continue.

- If you are using Outlook 2003, then this screen will allow you to pick the type of protocol you want to use (POP or IMAP). Select the one you want and click Next >. Skip to step 5.
-
On Office 2007 you should select Internet E-mail and click Next >.

-
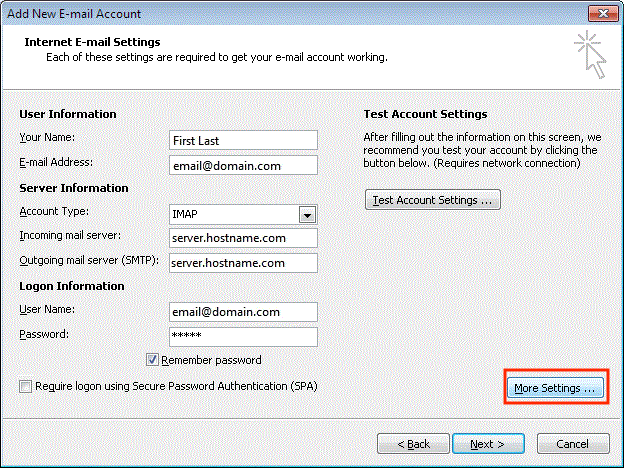
Fill in your account details as appropriate and then click More Settings...:
-
Under the User Information section, type the name you want people to see when they get mail from you in the Your Name field.
-
Enter your E-mail Address including the domain name.
-
In the Server Information section, first select the Account Type protocol. You can choose IMAP or POP.
✅ If you'd like to understand more about the differences between the IMAP and POP protocols. please see this article.
You will not be able to change this selection later once the account is set up. If you are unsure what to pick, choose IMAP.
-
The Incoming mail server is typically your server's hostname, your domain name or mail.yourdomain.com.
-
Outgoing mail server is often the same as your incoming mail server, but in some rare cases they might be different.
-
Under the Login Information section, you should enter your email account User Name. This is frequently your full email address, but sometimes it can be the part of your email address that appears before the @.
-
Enter your email account Password and you can check the box next to Remember password if you would like Outlook to not prompt you to re-enter your password every time it tries to send or receive mail.
-
Leave the checkbox next to Require login using Secure Password Authentication (SPA) unchecked. SPA is a proprietary Microsoft authentication method that few mail servers are configured to support. This setting is not the same as secure authentication via SSL/TLS (which you should use).
-
There are some additional settings to be filled out before Outlook will be able to send or receive mail. Click the More Settings... button to bring up a new window with some additional options.
-
-
At the top of this new window, there are some tabs. Click the Outgoing Sever tab.
-
Now you can set some additional outgoing mail server options:

-
Make sure that My outgoing server (SMTP) requires authentication is checked. While some mail servers may use POP before SMTP for authentication, most do not due to the potential security concerns. Checking this will make sure that Outlook tries password authentication before attempting to send mail.
-
Typically, the login information needed for outgoing mail service is exactly the same as what you use for incoming mail. If this is the case for your account, make sure Use same settings as my incoming mail server is selected.
-
If not, select Log on using and enter the outgoing mail server User Name and Password for this account. Choose whether you want Outlook to Remember password or not and you should probably leave SPA unchecked.
-
-
Click the Advanced tab at the top of this window to see the inbound and outbound port options and other special settings:

-
The section you'll want to review carefully is the Server Port Numbers area.
-
By default the Incoming server and Outgoing server will be set to the standard insecure port numbers. If you want to send and receive mail without encrypted connections to and from the mail server, then you can leave everything set as it is. This is not recommended.
✅ Some ISPs block connections to port 25, so your mail server may have an alternate port number you can use to make insecure
-
If you want to send mail using a secure connection, then set the incoming port to 993 if you are using IMAP or 995 if you are using POP. Set the outgoing server to 587 or 465 if 587 doesn't work for you.
-
-
Click OK to apply these settings.
-
You'll be back at the original screen. Click Next > to apply all of the changes.
✅ Congratulations, you are done!