Methods for Reporting Spam or Good Email to HostDime's Email Filter Services
When you have HostDime's Email Filter services (inbound, outbound or both), there are several ways you or individual email accounts can report spam that slipped through our net or the rare good mail message (sometimes called "ham") that accidentally got quarantined.
Reporting Spam or Not Spam
There are many ways to manage this, pick your preferred method from one of the tabs below.
⚠️ You can only report messages as spam or not spam (sometimes referred to as "ham") that our filtering service has already seen and accidentally let through. Sending mail our service hasn't previously investigated and isn't to/from an email account in the filtered domain will be ignored.
Also, please make sure that a message is actually spam before you report it. A lot of people forget that they signed up for a mailing list or service and then report those messages as spam when they really aren't. If you want to get off a mailing list that you previously signed up for, look for the unsubscribe links near the bottom of the message.
Forward Mail as Attachment
✅ This method works best with desktop email clients like Outlook, Windows Mail, Apple Mail or Thunderbird. The standard mail clients on most mobile platforms do not support forwarding messages as attachments.
Forwarding mail as an attachment sends a copy of the message as a physically separate file with all headers and the body untouched. This is critical for spam reporting, because our service needs to be able to see all of the headers in the spam message as well as the unmodified body.
If you forward a message in the body of another message as most email clients do by default, only a few headers are included (like From: and To:) and the body of the message itself is often modified (quoted). This will not work.
- Start your mail program.
- Select the message that our service has accidentally let through but which you are absolutely certain is spam.
- Forward that message as an attachment to the email
address: spamreport@spamrl.com
- How you forward a message as an attachment varies. Here are some
common methods:
- Right click on the message or group of messages and choose forward as attachment from the drop-down menu. (Thunderbird or Apple Mail work like this.)
- Compose a new email message to spamreport@spamrl.com in a separate window. Drag and drop one or more messages from your mailbox window into the newly composed message. (Windows Mail or Exchange can work like this.)
- Go into the preferences for your email client and change how messages get forwarded by default so they attach forwarded messages. (Some older mail clients work this way.)
- How you forward a message as an attachment varies. Here are some
common methods:
- We do offer an email address you can forward mail as an attachment to in order to report a message as not spam, but generally you won't receive messages we identify as spam, so its usefulness is limited. The address to forward mail to is: notspamreport@spamrl.com
Report Spam via Plugin
✅ This method only works with desktop mail clients. It doesn't work at all with mobile mail clients.
We offer some special plugins for commonly used desktop mail clients to help make it easier to report messages to our service.
Outlook for Windows
We have a special plugin for this popular business-focused mail client.
32 and 64 bit Plugin (Click here to expand or contract...)
64-Bit Outlook Plugin
32-Bit Outlook Plugin
ℹ️ If you are uncertain of which version to use, try the 64-bit version first unless you are using Outlook 2007 or earlier. You can always check the About box in Outlook to see what version you have installed.
- Download the appropriate version of the plugin to your computer.
- Quit Outlook if it is already running.
- Decompress the file and you should have a setup.exe file and a ReportSpamx32/64.msi file
- Run the setup.exe file as an administrator to ensure you have all of the needed requirements for the plugin to work. If you run the setup.exe file and are told you are trying to install an older version of a component that is already installed, stop the installation and continue with the next step.
- Run the .msi file as an administrator. You can install the plugin only for your account or for anyone who logs into your computer.
- Start Outlook and now you should be able to report spam for all filtered domain email accounts configured in Outlook by selecting a message that should have been caught as spam and click once on the message from your inbox and then click the Report Spam button. This will report the message as spam to our service and then throw the message into the trash.
Thunderbird for Windows, MacOS or Linux
We also have a plugin for this popular free mail client that works on all major platforms. This plugin can only report misidentified spam, not good messages accentually labeled as spam.
Thunderbird Extension (Click here to expand or contract...)
You can find the Thunderbird extension here:
https://addons.thunderbird.net/en-US/thunderbird/addon/expertspam/
or search for "expertspam" from the search field under Tools → Addons → Extensions
- Launch Thunderbird.
- Go to Tools → Addons → Extensions.
- If you downloaded the expertspam.xpi file to your computer, drag and drop it into the Extensions window. You will be asked to confirm if you want to install the extension and then you need to restart Thunderbird to activate it. Skip to step 5.
- If you didn't download the expertspam extension yet, type expertspam into the search bar on the right of the Extensions screen. Click the Add to Thunderbird button next to that extension and confirm that you want to install it. Restart Thunderbird to activate the new extension.
- To report a message as spam from your filtered domain, select the
message and from the message window or pane and click the small
report spam icon.
- Alternately, you can select one or several messages that are spam in your inbox and then right click on one of them and select Report spam from the drop-down menu.
Apple Mail for MacOS
This Automator workflow works with the mail client that ships with MacOS X.
Apple Automator Workflow (Click here to expand or contract...)
Installer
Workflow Only
ℹ️ Some anti-virus tools may incorrectly identify the installer as containing a potentially unwanted program. This is a false positive, but we've included just the SpamReporter workflow itself if you prefer to install it yourself.
- Quit Apple Mail if it is running.
- Download either the installer or the workflow.
- If you want to use the installer, double click on the .dmg file to mount it and double click on SpamReporter OS X to start the installation. Skip to step 5.
- If you want to install the workflow manually, decompress the workflow and double click on it. The OS should prompt you to install the workflow.
- Start Apple Mail. When you see a message in your filtered domain that you are certain should be identified as spam click on the message, go to the **Mail **menu and select Services. From the drop-down select SpamReporter.
Report Spam or Ham via IMAP as Domain Owner
✅ This method works when logged in as the main domain user or as an individual email user.
It is not going to work well on mobile mail clients.
You can report spam or not spam in your email client via IMAP to help train the system.
⚠️ Despite how it may look, this is not a real email account, it is just a special set of mostly write-only mail folders. You can't view or respond to mail in this account. You move messages into one of the folders in this account from the actual filtered email account and a copy will be reviewed by our service to improve filtering in the future.
-
In order for this to work best, this account should be set up in the mail client that you typically use to check your filtered domain email.
-
Set up a new IMAP "mail account" in your client and use the following information:
- Email address: Many mail clients ask you to start the setup process by specifying your email account. Since this is not a real email account, your mail client won't likely discover the correct IMAP settings. You can specify any email account in the filtered domain if you want (you'll be adjusting things shortly).
- Account Password: This is the domain or email user password set up in our mail filtering service, which is hopefully not the same as the password for your actual email account(s).
- IMAP or Incoming Mail Server: Use quarantine.antispamcloud.com in this case (even if your mail client tries to suggest a different server).
- SMTP or Outgoing Mail Server: Use quarantine.antispamcloud.com in this case (even if your mail client tries to suggest a different server).
- IMAP/SMTP Username: If you are using the domain user login, use the username and password we provided you when we set up your domain filtering. If you are using the individual email user account, this will typically be the full email address.
- Use port 993 (SSL/TLS) for incoming or IMAP connections with password authentication.
- For outgoing or SMTP connections, set the port to 25, no authentication and no SSL/TLS (this is not a real email account, so you can't actually send mail through it).
- Disable all email checks for this account. Again, this is not a real email account, it's just a place to drop messages to train our system.
- Do not save mail locally (if that is an option for your email client).
-
Once set up, you should see some or all of the following mail folders in the account. If you don't see them, check your mail client to make sure you're subscribed to all available mail folders.
ℹ️ You may not have all of the folders listed below.
- Caught (incoming/outgoing): You may have this to show you messages our system has caught recently that it thinks are definitely spam. This is a folder that you can read and write to.
- Training Requested: This folder will only have things in it if we've configured it on our end. These are messages that our system might be unsure about and would like your help in determining. Drag the messages to the spam/not spam folders as appropriate. This is a folder that you can read and write to.
- Release: Move messages from the Caught folder to this folder to deliver that message to the end-user's mailbox without changing the way our system classified the email. You may want to do that if you are uncertain if something really is spam and the user wants to look at the message before making that determination. This folder is write-only. You won't see any messages in here.
- Release and Train: Move messages from the Caught folder into this folder to teach our system that the message is not actually spam and then have our system deliver the message to the user. This folder is write-only. You won't see any messages in here.
- Spam: Move delivered messages from your filtered mail account into this folder to teach our system that the message is spam. This folder is write-only. You won't see any messages in here.
- Not Spam: Move messages from the Caught folder into this folder to train our system that this message is not spam. Dragging the message here will not deliver the message to the end user. If you want that, use the Release and Train folder instead.
Report Spam or Ham via our Control Panel
✅ This works on desktop clients only. Most mobile or webmail platforms won't be able to download messages as files.
Note that .eml or .msg files are really just plain text files containing nothing but the complete headers and message body in a single file. Even if your mail client doesn't output .eml or .msg files you may be able to just view the raw source of a message and copy and paste the content into a text file and then save it and change the extension to .eml.
It is possible to help train our system by dragging and dropping .eml or .msg files into our anti-spam control panel using a web browser.
- Create a folder on your desktop to save the spam or ham (not spam). This will make it easier to differentiate the files later.
- Launch your mail client.
- Find messages in the filtered domain that are spam. Select those messages and drag and drop them into the spam folder you made on your desktop. This should work in most mail clients. If it doesn't, go to the File menu and select Save or Save As and select "file" or "raw message message source" or something similar. Save the messages that way into your spam folder on the desktop.
- Repeat the steps above for any ham you would like to train and save them into a separate ham folder on your desktop.
- When done, you can quit your mail client if you wish and then launch your web browser.
- Go to https://login.antispamcloud.com/ and log in as your domain or email user.
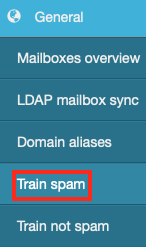
- In the sidebar on the left, select Train spam from
the General section.
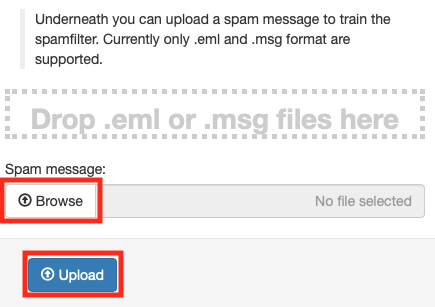
- Open the spam folder on your desktop and drag and drop the spam
messages into the dashed line box near the top of the browser
window. Alternately, click the Browse button and navigate to the
spam folder on your desktop and upload the messages that way. When
done, click the Upload button.
- You can repeat this process with ham by selecting Train not spam from the sidebar and uploading the ham messages in the same way as you handled the spam messages in step 8.
- Our system will process the messages and the system will be trained to recognize those sorts of messages better in the future.
Report Messages as Spam or Ham in Quarantine
✅ This method should work fine on any platform with a web browser.
It is possible to view the logs of all messages scanned by our service and you can report spam or ham (not spam) that way.
-
Log into https://login.antispamcloud.com/
-
Depending on which products you have through us, there are several places you can go to report spam or ham, all of which are log views with slightly different filter (rules) changes to focus by default on certain types of messages.
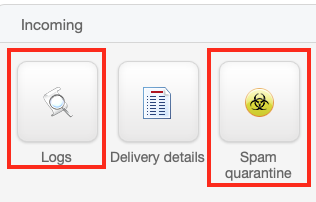
- If you have our inbound Mail Filter service, you'll
have Logs and Spam quarantine options in
the Incoming section. Logs is the section optimized for
general inbound mail searching. Spam quarantine is
configured to show only quarantined (caught) spam messages.
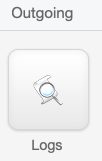
- If you have our outbound Mail Filter service, you'll have
a Logs option in the Outgoingsection. This is a log
search that is focused on displaying only outbound messages.
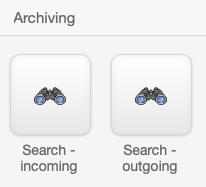
- If you have our Mail Archive service, you'll have Search -
incoming and Search - outgoing in
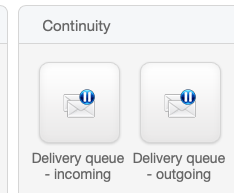
the Archiving section. You will also have Delivery queue- incoming and Delivery queue - outgoing in
the Continuity section. You will only be able to report
spam or ham if you also have inbound or outbound Mail Filter
service.
- If you have our inbound Mail Filter service, you'll
have Logs and Spam quarantine options in
the Incoming section. Logs is the section optimized for
general inbound mail searching. Spam quarantine is
configured to show only quarantined (caught) spam messages.
-
The rest of the steps below will assume you are viewing the incoming logs, but the process for reporting spam or ham remains largely the same regardless of which type of log view you are using.
-
The logs can be refined by a wide variety of criteria. If you want to be able to filter based on message content, you'll need to (re)generate the message content index. Click the Regenerate Index button near the top of the screen. Select the start and end dates and click Generate to start the indexing process. It will complete in the background.
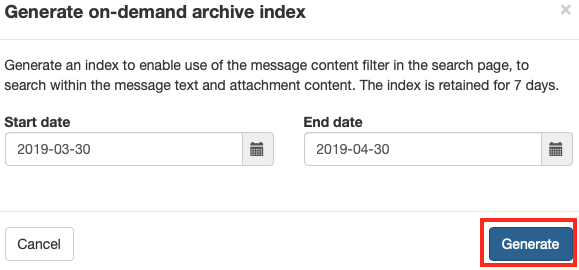
ℹ️ The indexing feature is entirely optional and completely automated. This index is stored encrypted in our service. The index will be kept for 7 days and then deleted automatically.
-
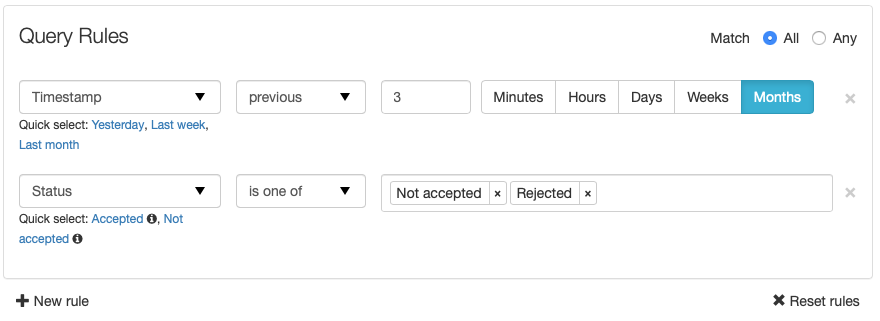
There may be a lot of mail logged by our service, and you probably don't want to have to crawl through thousands of messages looking for the one you care about. Thankfully our service gives you a very robust set of rules you can use to filter the logs. Use the Query Rules section to limit the messages you are looking for. If you don't care to adjust the log filtering, you can skip down to step 7 below.
Click here to expand or contract...
- Depending on the log view page you are on, there will probably be at least one rule configured already, but you can add more by clicking the + New Rule button.
- Select the type of rule from the first drop-down on the rule line. There are a wide variety of options.
- Depending on which rule type you choose there will be a variety of other items you can set as well. Choose options as you see fit. Some items will have some Quick select options. Clicking one of them will automatically fill out the rest of the rule items to filter for that condition. Some Quick select items will have a small circled "i" next to the action. Hovering over that will provide you more information about what that action does.
- If you have more than one log item, there will be a set of radio buttons next to the top-right of the Query Rules box. Selecting Match All will cause our system to make sure that the displayed log items meet every one of the conditions set by these rules. For example, in the screen shot above, the system will only display log entries that match both "messages that were scanned in the last 3 months" and whose "status is not accepted or rejected." If we switched to Match Any then those same rules would cause the system to display all of the messages scanned for the past 3 months as well as all of the messages in the log that were ever rejected or not accepted regardless of how long ago the rejection happened.
- If you want to remove a rule, click the grey X to the right of the rule you want to remove.
- Click X Reset rules near the bottom right of the Query Rules box if you want to remove any custom changes you made and revert everything to the default for that screen.
-
Just below the Query Rules box, there are some additional options that control how the matched log items are displayed.

- Group results by: You can select any items that can be displayed in the columns of the log view. If you select something, it will cause the log display to be broken up into many smaller tables (rather than one large table as is the default). Selecting this separate from sorting the log table itself (which can also be done). Once you select a criteria to group by (you can only choose one), you can also control the order that these smaller grouped tables appear in, ascending or descending order.
- Items per page: You can control how many log entries will be shown per page by typing in a number and clicking the circled check icon to apply your change.
- Columns to be displayed: There are lots of bits of data that our system collects, but there are so many that it doesn't make sense to display them all as part of the table. However, if you want to add some (or even all) of those data points to the table, you can click on the drop-down list and check the boxes next to items you want to be in the table and uncheck anything you don't want to be in the list.
-
Show Results: (The button will only display a magnifying glass, as in the screen shot above if your display width is not wide enough.) Clicking on this button will apply all of the Query Rules and other settings you've selected and display the results in a table (or multiple tables if you group results) below.
-
Once you choose what logged items to display, you can make one final adjustment to how they are sorted by clicking on the header for the column you prefer to sort the results by. The item the results are currently sorted by will show a single small up or down arrow next to the title of the column. If you want to change that, click on the column you prefer to be the primary sorting field. Click it again to toggle sorting by ascending or descending value. The arrow direction will change appropriately. Columns that are not the main sorting field will show both an up and down arrow together next to the column title.

-
Now that we have some log entries to view, we can review the logs for spam or ham.
-
Any message that was scanned by our service will show what sort of message we think it is in the Main class field (spam, not spam, uncertain, etc.). The Status field will show what we did with the message (delivered, quarantined, not-accepted, rejected, etc.).
-
If a message in the list was identified as probably being spam, it gets quarantined automatically. When a message is quarantined (or nearly any message if you paid for our email Archive service), our system temporarily retains copies of the full message content, including all headers so that you can train our system if needed. You can click on the Subject line in the log for quarantined messages to take a closer look at it to see if it really is spam or not. When you click on the subject of a message we've retained the full message content for, it will overlay a box showing you the content of the message and also give you a number of different options.
-
Near the top-left of this box, you can select how to view the content of the message. Click one of these tabs to view the message in that format.
- Normal: This is the default and it makes the message look like you would typically see it if you viewed it in an email client with image display turned off.
- Plain: This will display the plain-text version of the email (if there is one). This is how the message would look in your email client if you set it to display only the plain text versions of emails.
- Raw: This shows the full headers (and the unprocessed view of the body if you choose to display that as well. This is what the message would look like if you chose to "display source" or "show raw message" from your email client.
-
You can view the actual message in the main part of this box. Once you've done so, you can decide if anything else needs to be done.
-
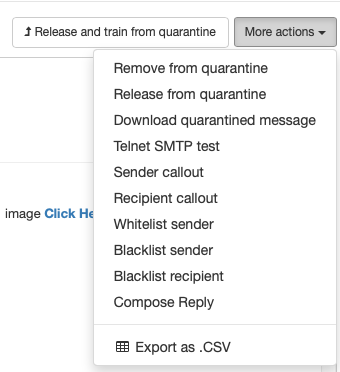
On the top right, there are two buttons, one of which actually is a drop-down of many options
-
Release and train from quarantine: This button will be Redeliver archived message if you are viewing an archived message rather than a quarantined one. Either way, clicking this button will deliver the message to the originally intended recipient. If the message was quarantined clicking this button will also train our system to recognize this message as ham instead of spam. It may take a few minutes for the message to be delivered to the original recipient.
-
More actions: Click this to reveal a wide variety of other options that relate to this message.
ℹ️ You may not see all of these options or you may see others depending on the type of message and the services you have with us.
Click here to expand or contract...
- Remove from quarantine: Removes the stored message body and full headers from the quarantine. This doesn't remove the basic information that is usually collected from messages that pass through our system.
- Release from quarantine: This delivers the message to the original recipient withouttraining our system.
- Download quarantined message: If you'd like to download the message as an .eml file, you can select this item and the message will be downloaded to where ever your browser typically places files.
- Telnet SMTP test: This is an advanced testing tool. Selecting it will take you to a completely different area in the control panel. Discussing the purpose for this sort of test or how it works is beyond the scope of this article.
- Sender callout: This reruns a test to see if the sender email address actually exists or not. Spammers often fake the From: line, so that address may not exist (and thus is almost definitely spam). This takes you to a separate area of the control panel and tries to test a connection to the sender.
- Recipient callout: This runs the same test as Sender callout, but it tries to make a connection to the recipient listed in the To: line. Some spammers fake the To: line as well as the From: line to confuse you.
- Whitelist sender: This places the sender on a special list so that if a message comes from this sender again it will be delivered without getting quarantined. This is not the same as training our system. You are basically telling us to not scan messages from this sender. Choosing this will take you to a different area of the control panel to whitelist the sender. It will fill out as much of the form as possible, but you'll need to choose if you want the whitelist to apply to the envelope-from header, the From: line or both. The envelope-from header is not typically shown by email clients and it may be a bit harder to spoof than the To: line.
- Blacklist sender: This is just like the whitelist sender option, except you are telling the system to immediately refuse to deliver mail if the sender matches the one from this message. This does not train our system, it just tells us to immediately refuse the message.
- Blacklist recipient: You can choose to blacklist the recipient if the spammer is faking the To: information consistently. Be careful with this feature as you could accidentally end up blacklisting legitimate recipients.
- Compose Reply: This only appears if you are paying for Email Archive service from us. You can respond to the sender of this message from within our control panel.
- Export as .CSV: .Comma Separated Value files are a common format. If you have a spreadsheet program, it can import data in this file so that each item is in a separate column (similar to how you are viewing it in our control panel).
-
-
You can close this message box by clicking on the X near the top-right of the box or clicking on the Close button at the bottom-right.
-
Messages that are identified as probably not spam are delivered and the extended information needed to train our system is not stored by us (unless you've paid for our Email Archive service). You can still use the multi-message options or the drop-down menu next to the checkbox for a message to report whitelist or blacklist a sender or recipient as described below.
-
You don't have to click on the message subject to view a message in order to take action on it. If you know just from the information displayed in the log table that a message is or isn't spam or want to try one of the other things listed under More actions above, you can click the small down arrow next to the message selection checkbox on the left.

-
If you'd like to take action on several messages all at one time, check the boxes next to each message you want to perform the same action on. A new option will appear on the bottom-left of the log screen. Select an action from the drop-down menu next to Apply to selected and if you are certain you want to do this click the Apply button and follow the directions, if any.

-
If you want to train our system that messages we delivered as ham are in fact spam, you can use one of the other reporting methods in this article to accomplish that. Since you are already in our control panel, we suggest you use the Train as not spam option described in the Report Spam or Ham via our Control Panel tab in this article.
Report Spam or Ham on iOS or Android
✅ This only works on Android or iOS. It doesn't work on desktop machines unless you have an emulator.
You can use a dedicated application on your iOS or Android-based device. Tap the appropriate link above from your device to go directly to the store page for this app. It is free.
-
Once you install the application, launch it and then log in using your domain user or email user credentials. Typically the domain user username is your domain name and if you have set up an individual email user, the username will often be the full email address.
-
When logged in, you can do nearly all the functions that are available for you in our control panel, including reporting spam or ham. You may want to review the directions in the Report Messages as Spam or Ham in the Quarantine tab above. While the look is somewhat different, most of the options and what they do remain the same.
If you have any issues with our service or have questions not resolved, please feel free to contact us.